Nextome Hub Web Guide
Prerequisites
Before reading this document, it is recommended that you read the documents:
-
The two solutions and the tools.
-
Fundamental definitions.
Aim of the document
The purpose of the present document is to provide a guide to use all the sections of the Nextome Hub Web. The main functionalities of the Nextome Hub Web portal can be divided into the following four subcategories:
-
Administrative functionality:
- User creation.
- Permission management.
- Ability to add maps in which to enable smartphone tracking or tag tracking.
-
Installation management:
- Registration of hardware (Beacons, Gateways, Tags) that are installed in facilities to enable indoor positioning technology.
- Battery monitoring of installed Beacons and Tags.
- Ability to delete, modify or move previously installed harware (Beacons, Gateways, Tags).
-
Management of service features:
- Creation of POI (points of interest) available for the navigation service.
- Creations of Fence areas to which a notification in the app can be associated.
- Customization of routes suggested by the navigation app (Paths).
- Creation of virtual rooms based on which to calculate possible metrics.
- Setting data retention times.
- Enabling additional services, such as, calculating metrics on positioning data.
-
Data view
It is important to note that the content of the Nextome Hub Web portal depends on the type of profile with which access is made. For instance, there are two types of profiles: the administrator profile and the user profile. The administrator can create and manage other utilities related to the Venues it has access to. The latter, instead, does not have the ability to manage the other utilities. In addition to this distinction, each user may have specific permissions related only to some of the resources in the system, as well as may have no visibility of others.
Login
To access the Nextome Web Hub (https://hub.nextome.com/), you must have the credentials for your user account, to enter in the login screen shown in Figure 1.
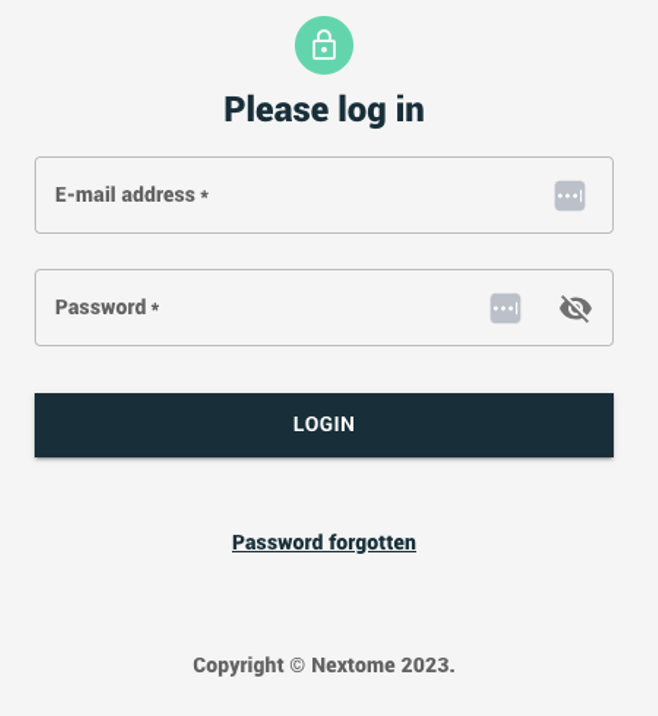
User creation is the responsibility of Nextome and is linked to an e-mail address provided by the user, who will generate the corresponding password. Each user account has specific grants associated that allow access to certain areas of the portal and that depend on the type of license granted. Therefore, it could happen that, within the Nextome Hub Web, some sections are not visible because they are not within the sections covered by the grants associated with the account user. One or more Venues can be associated with each user, and one or more Maps can be associated with each Venue. The following guide will describe all the sections in the Nextome Web Hub.
Main menu sections
Dashboard
On the 'Dashboard' screen there are the details of the selected Venue (632-Ufficio Conversano, area A, Figure 2).
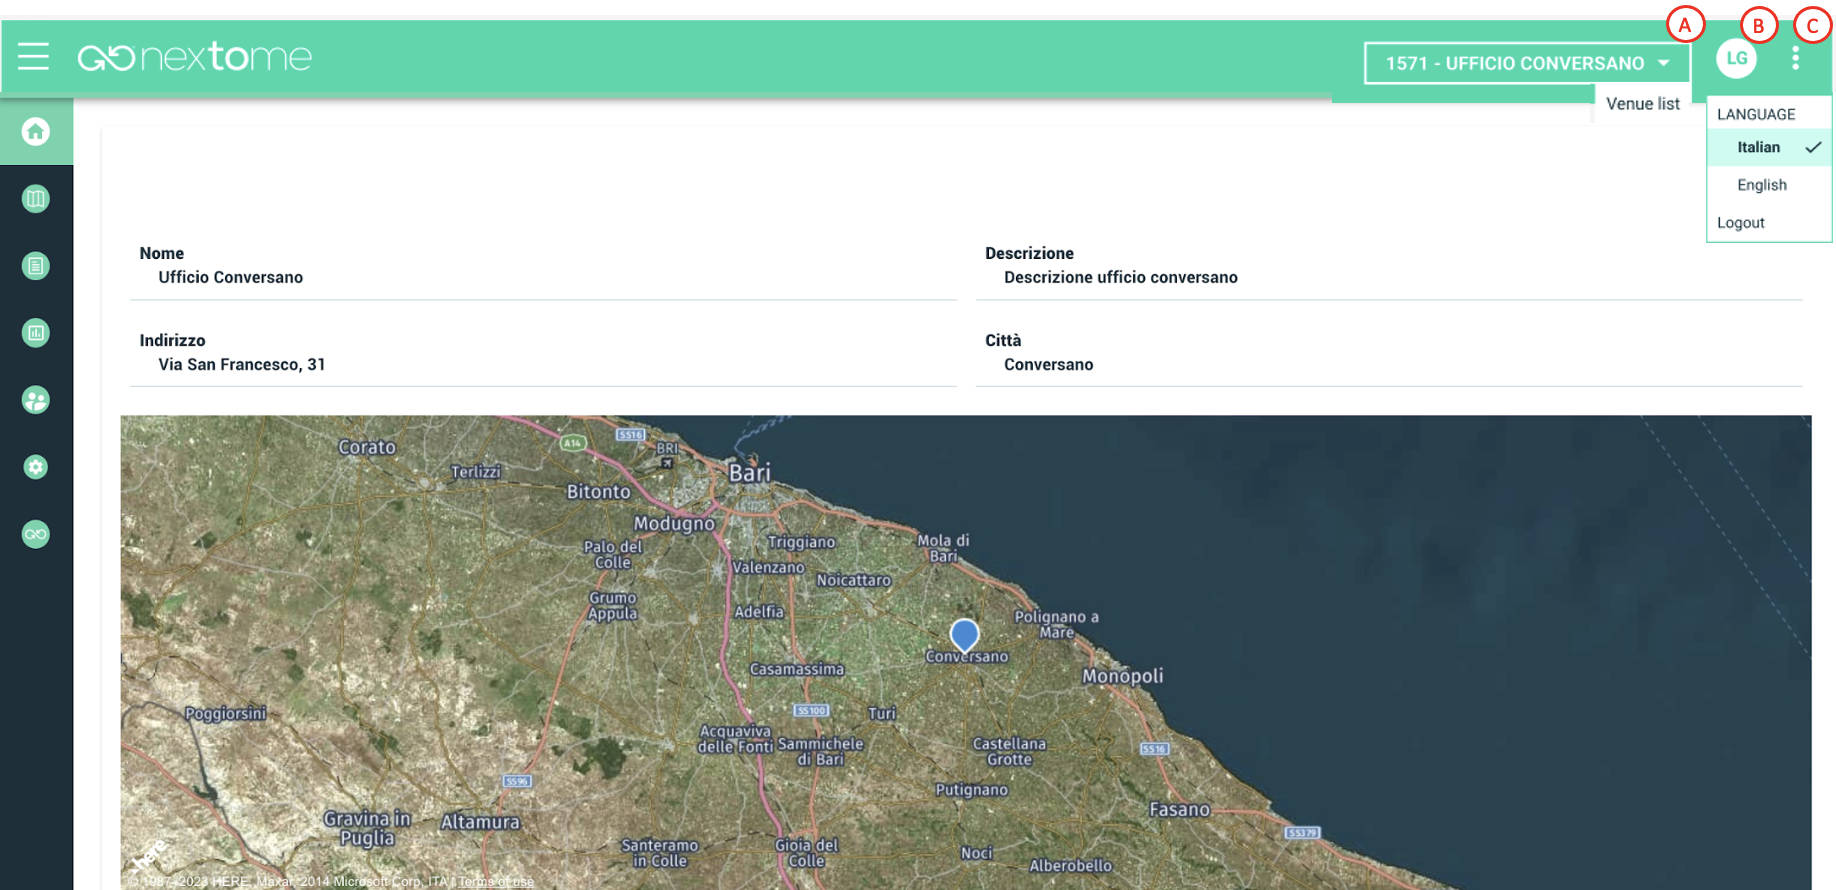
Clicking on area 'A' provides access to the list of Venues connected to the user account, while clicking on area 'B' provides access to the screen in Figure 3 containing the details of the user. Clicking on area 'C' it is possible to change the language or log out.
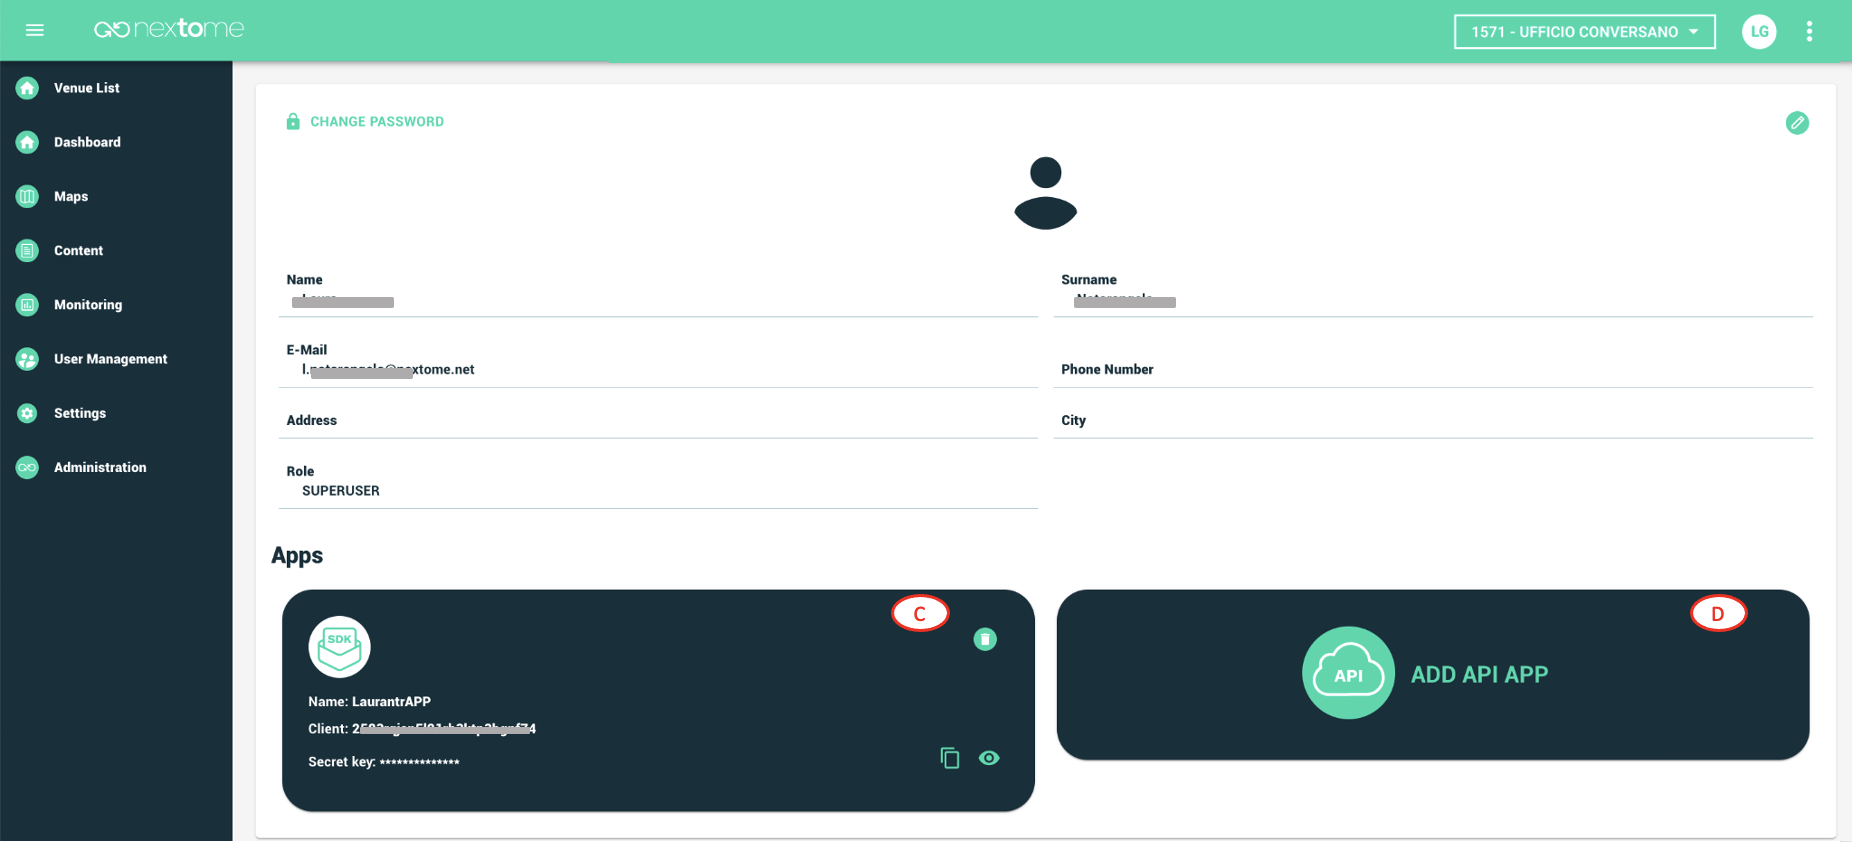
In addition to the visualization and editing of the information associated with the user, this section also allows to use the functionality indicated in the figure by the letters 'C' and 'D'. The 'Add SKD app' functionality enables the user to create the token to be included in a new app (for developers). The 'Add app API' functionality can be used to create the token that allows you to access API calls (for developers).
Maps
The 'Maps' section allows you to configure the system to enable indoor positioning technology and various additional services. This part is organized into 4 subsections 'overview', 'edit rooms', 'color piker', 'installation tips' which will be analyzed below.
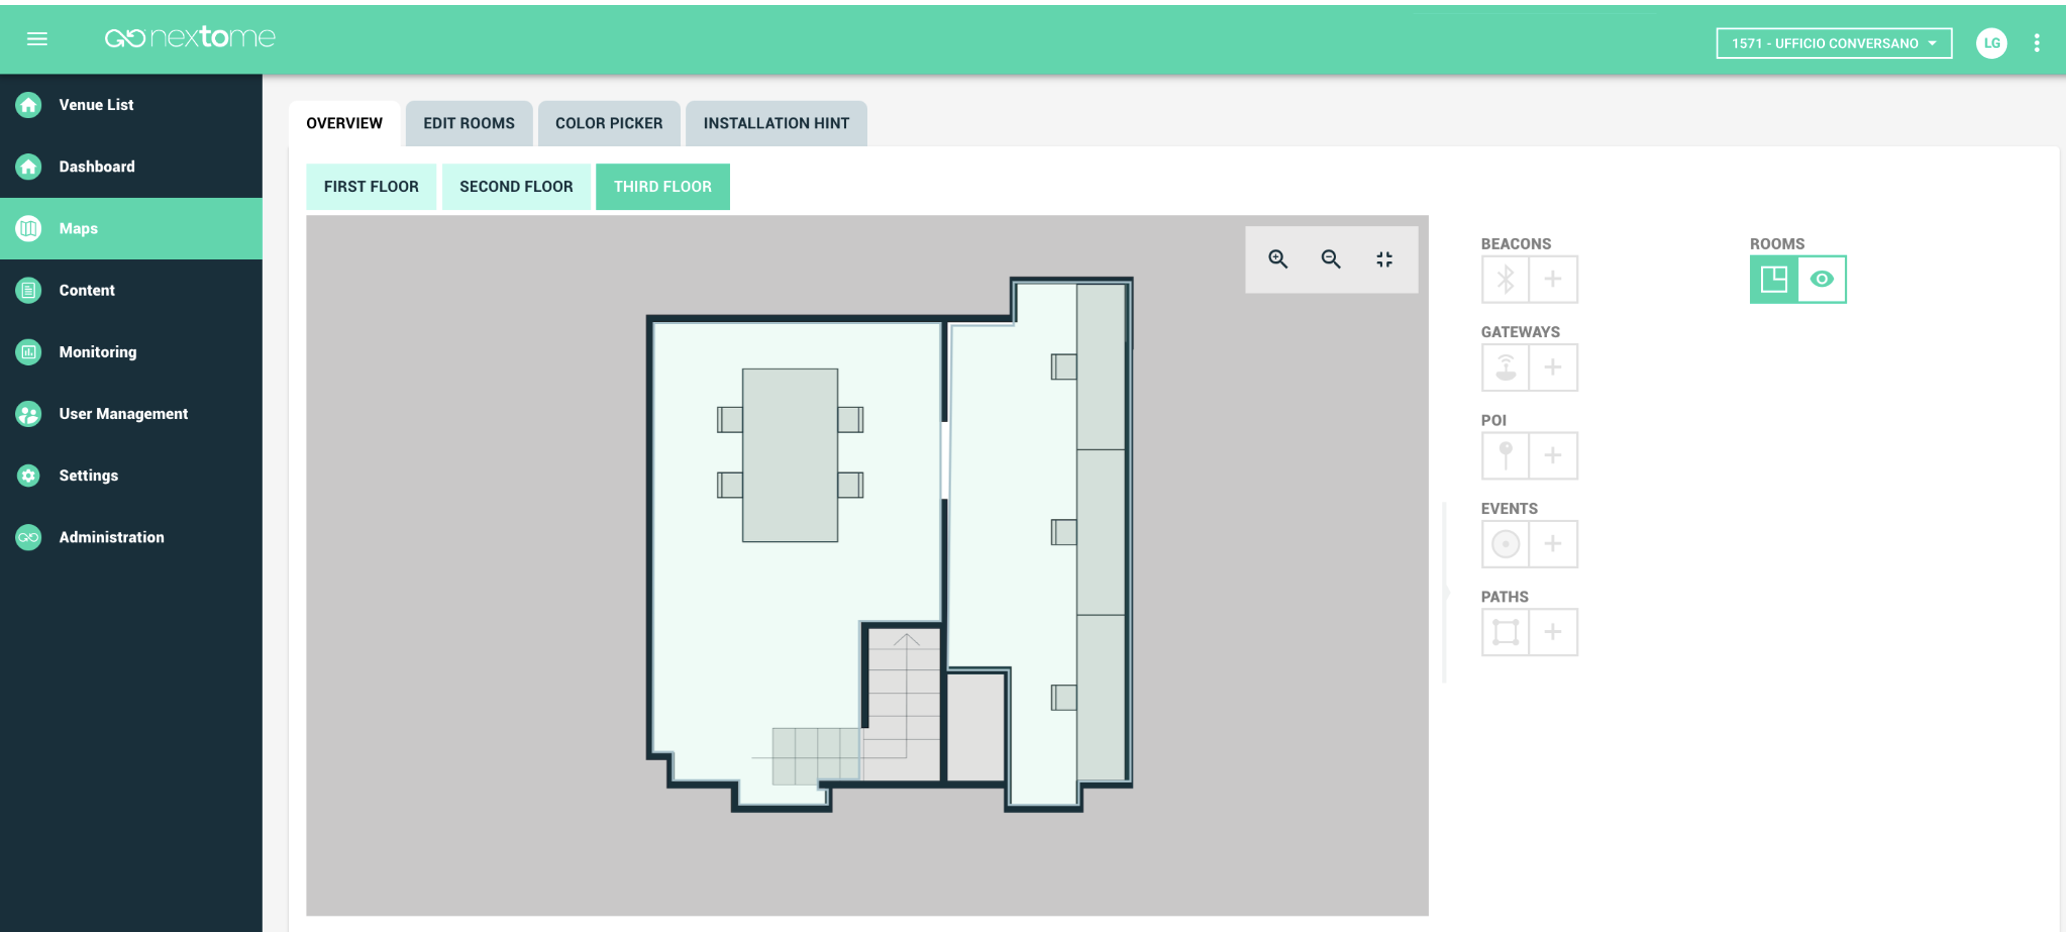
Overview
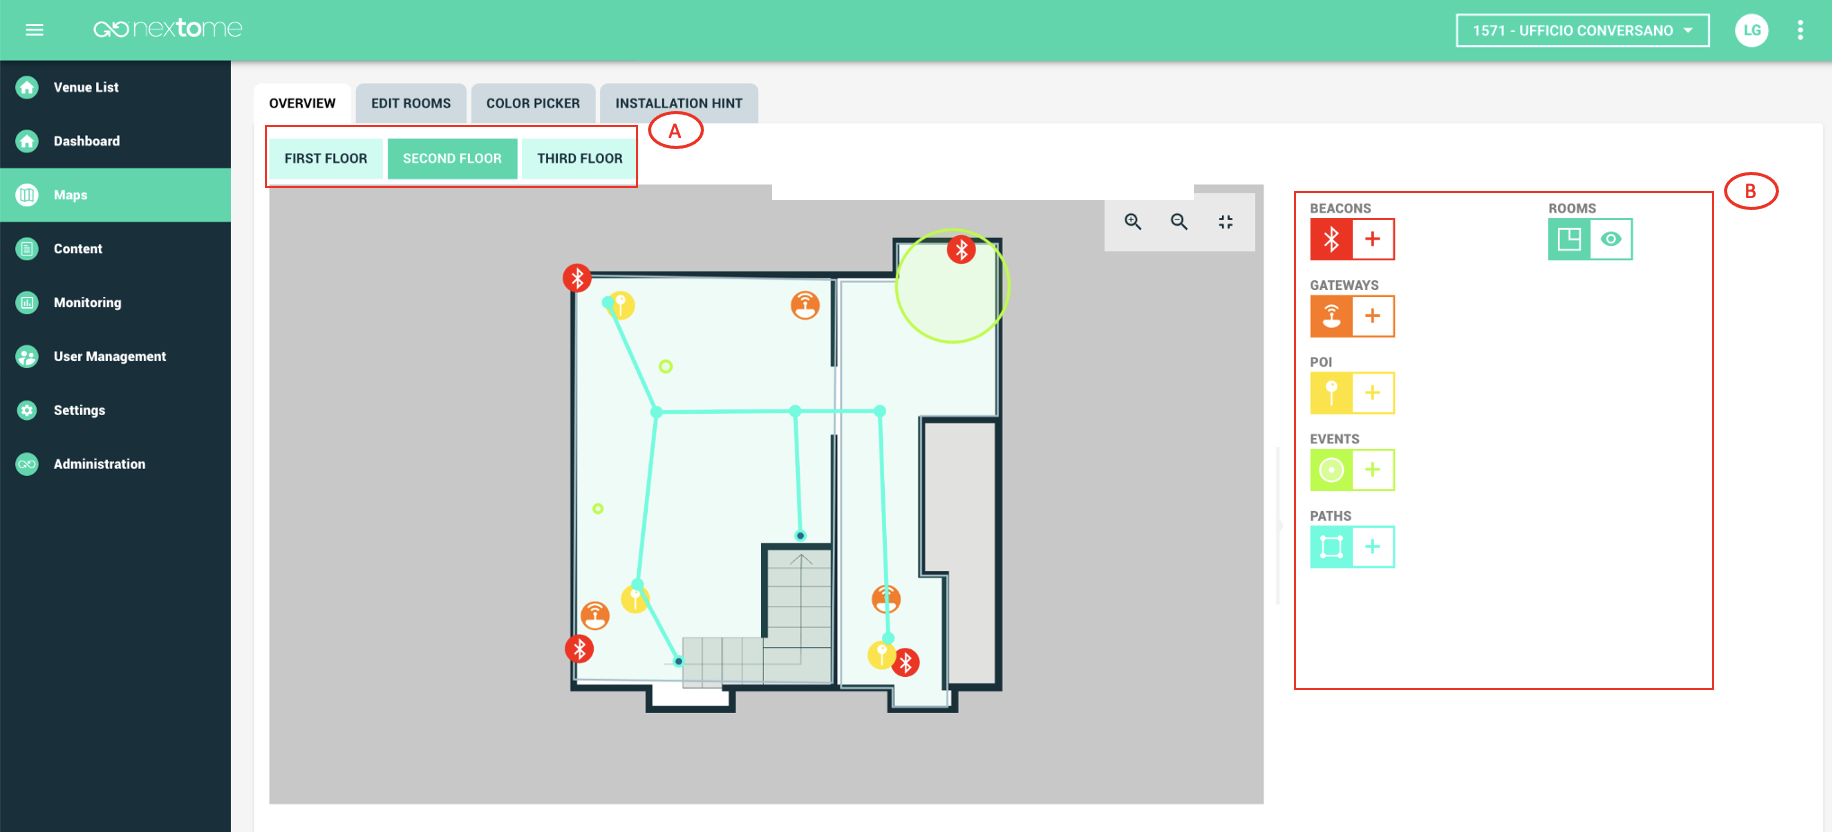
The 'Overview' subsection allows you to add objects on the map to enable location services and related features. In Box A in Figure 4, it is possible to choose which map to act on. In this case, for example, within the Venue 'Ufficio Conversano', there are three maps, first, second, and third floor. Box B, on the other hand, contains all the objects that can be added/displayed within the map. Among the available objects are Beacons and Gateways which are needed to enable smartphone tracking and tag tracking respectively. The remaining objects 'POI', 'FENCE', 'PATHS', and 'ROOMS' enable additional features.
Beacon management
Smartphone Tracking
Beacons are Bluetooth transmitter devices that are installed in the facilities where smartphone tracking is required via Nextome app. In addition to the finished installation of the sensors, registration of them is also required, which can be done through the 'Venue Configurator' app (recommended choice) or through this section of the Nextome Hub Web.
By first clicking on the '+' symbol that is located in close proximity to the red Beacon icon (point 1 in Figure 5), and then on the chosen map point, it will be possible to enter the sensor information and register it at the chosen location (point 2 in Figure 5). Proper registration of Beacons at the location where they are effectively installed is a prerequisite for the functioning of the proper smartphone location engine.

Instead, by clicking on the Beacon icon directly on the map (point 1 in Figure 6) it is possible to view related information, move, edit or delete the sensor (point 2 in Figure 6).

Gateway management
Tag Tracking
Gateways are Bluetooth receiver devices that are installed in facilities where tag tracking is required. In addition to the installation of the devices, registration to the system through this section of the Nextome Hub Web is also required.
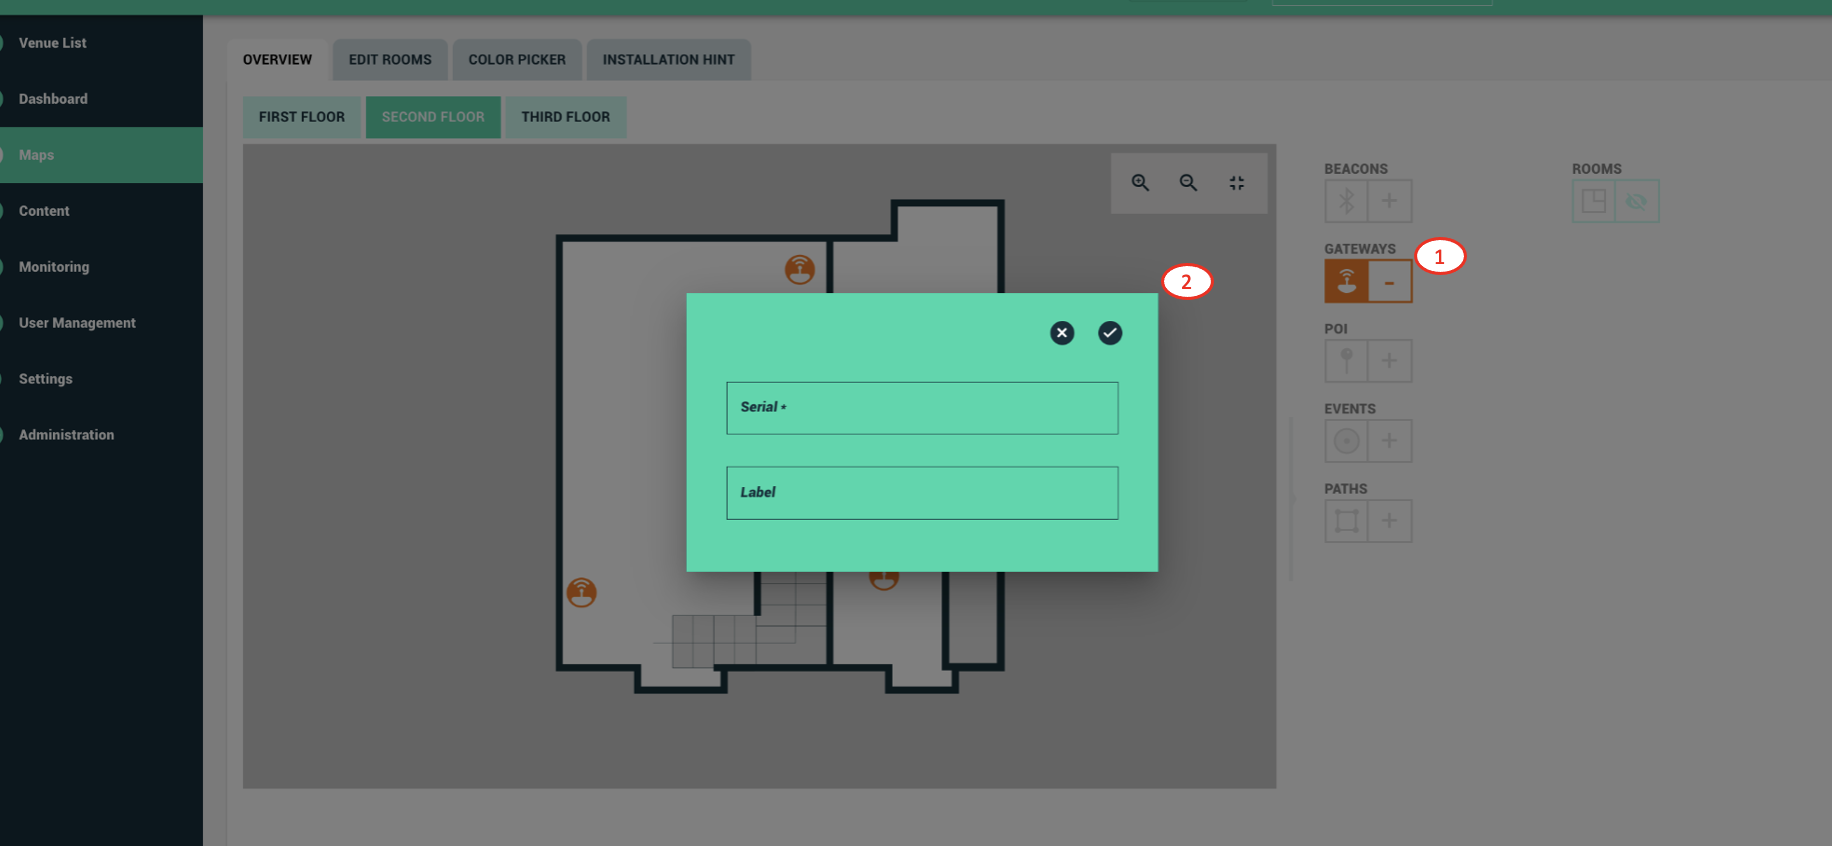
By first clicking on the '+' symbol that is close to the orange-colored Gateways icon (point 1 in Figure 7) and then on the map, it is possible to register the device at the chosen location, associating it with the relevant serial number and a name to recognize it (point 2 in Figure 7).
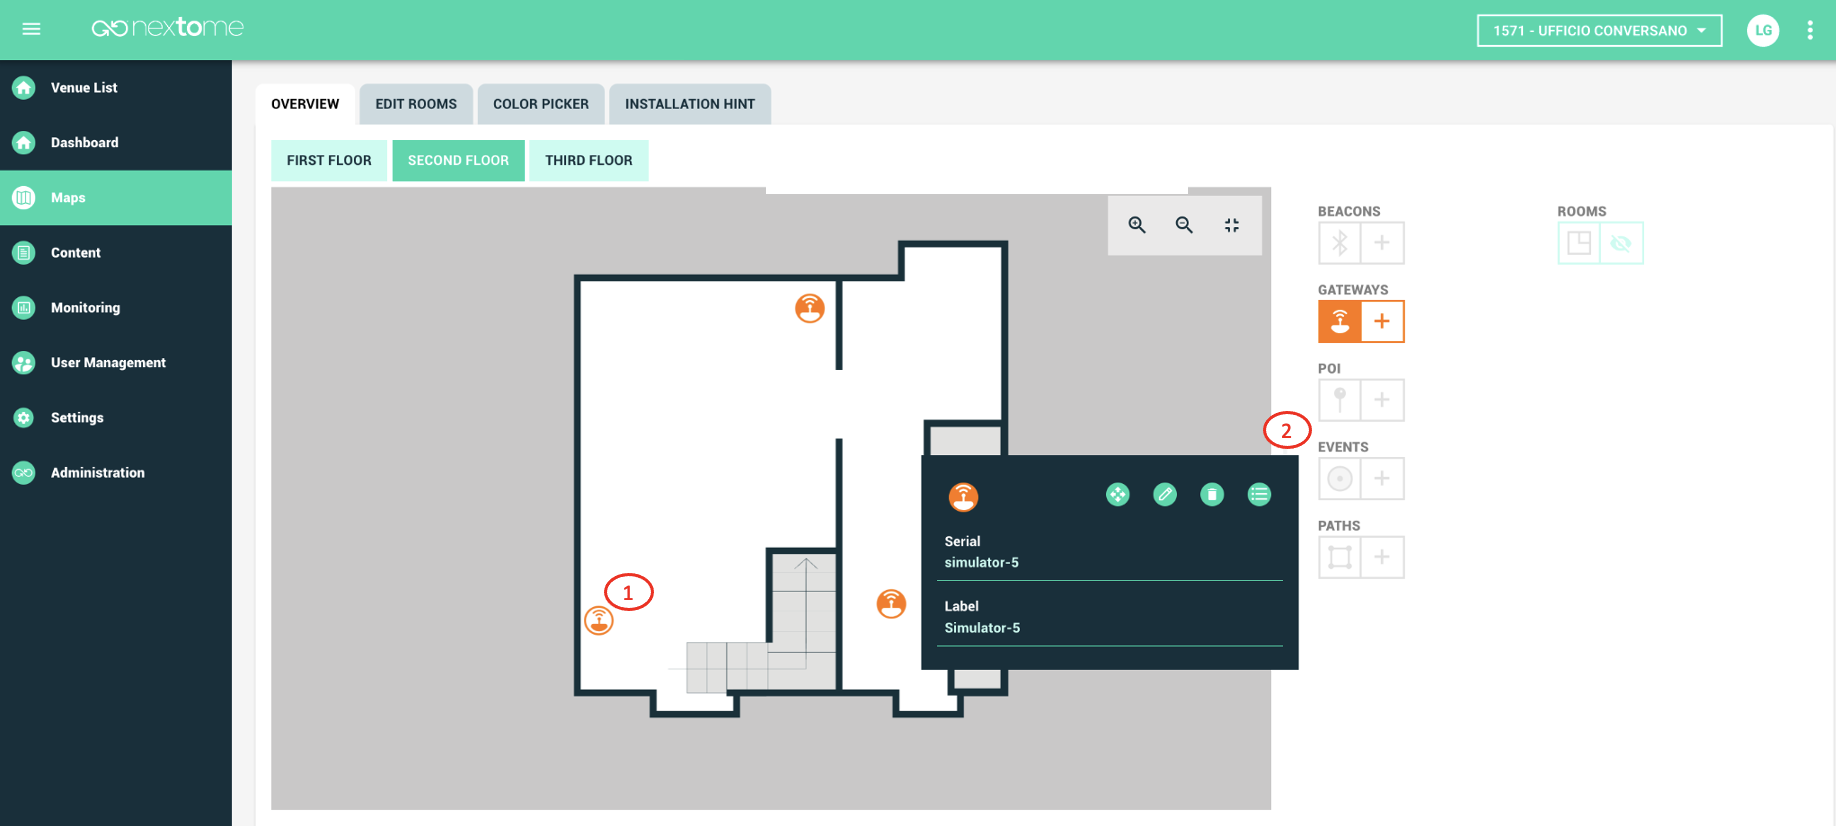
By clicking directly on a Gateway within the map (item 1 in Figure 8), it is possible to view its information, edit it, move it, or delete it (box 2 in Figure 8).
POI Management
Smartphone Tracking
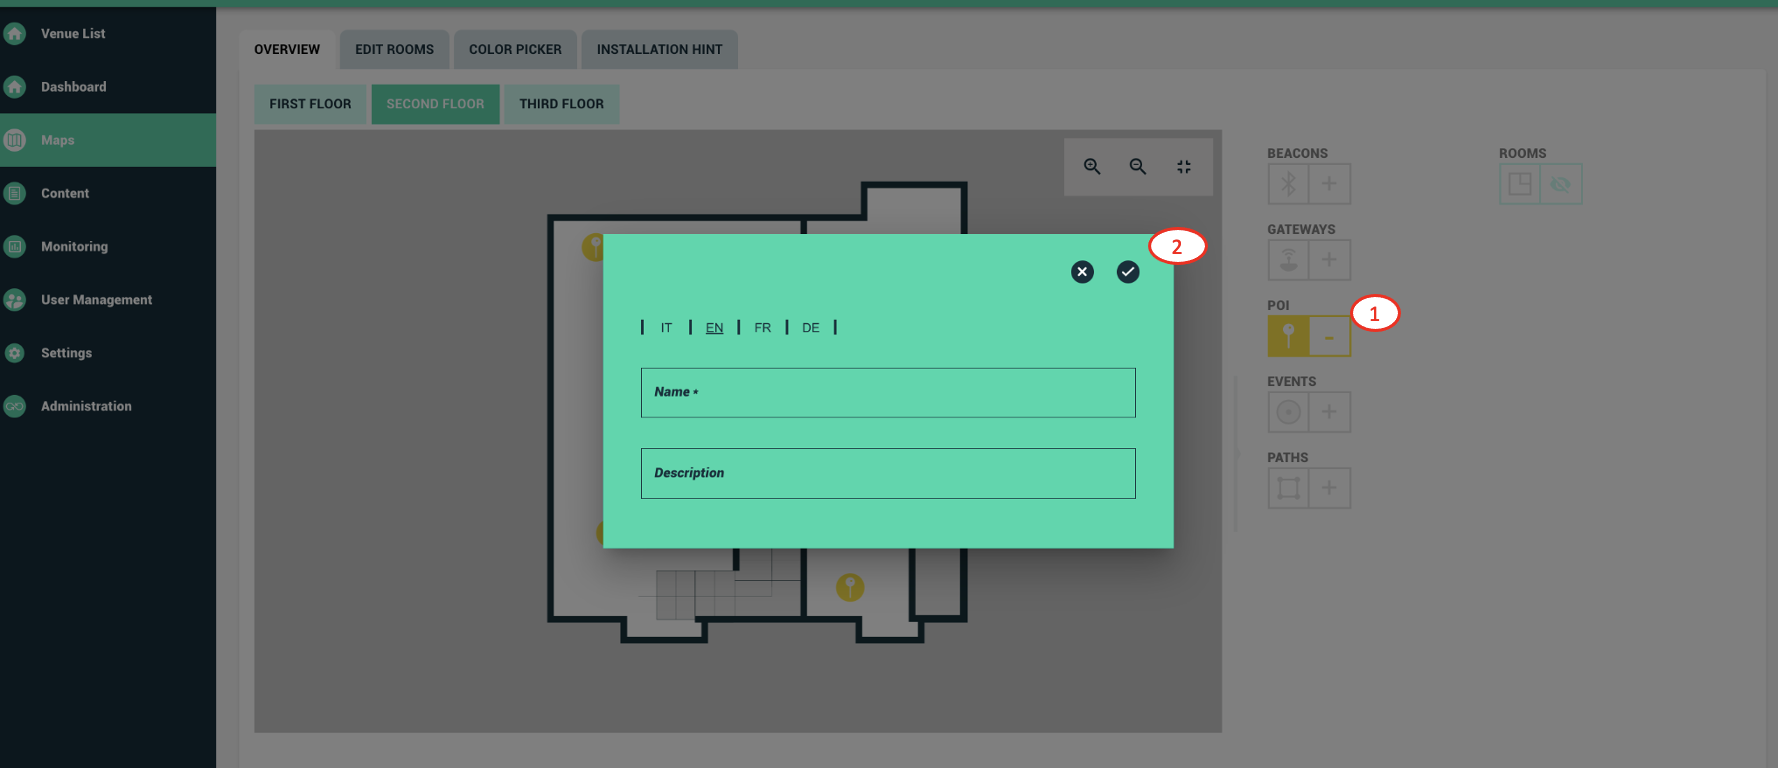
POIs (Points Of Interest) consist of specific points within the map to which it is possibile to associate a name and a description. POIs, entered from the Nextome Hub Web, are viewable on the smartphone app map when the navigation feature is enabled. POIs can be created by first clicking on the '+' symbol close to the yellow POI icon (point 1 in Figure 9) and then on the chosen map point. The entry is concluded by entering the data to be associated on box 2 in Figure 9.
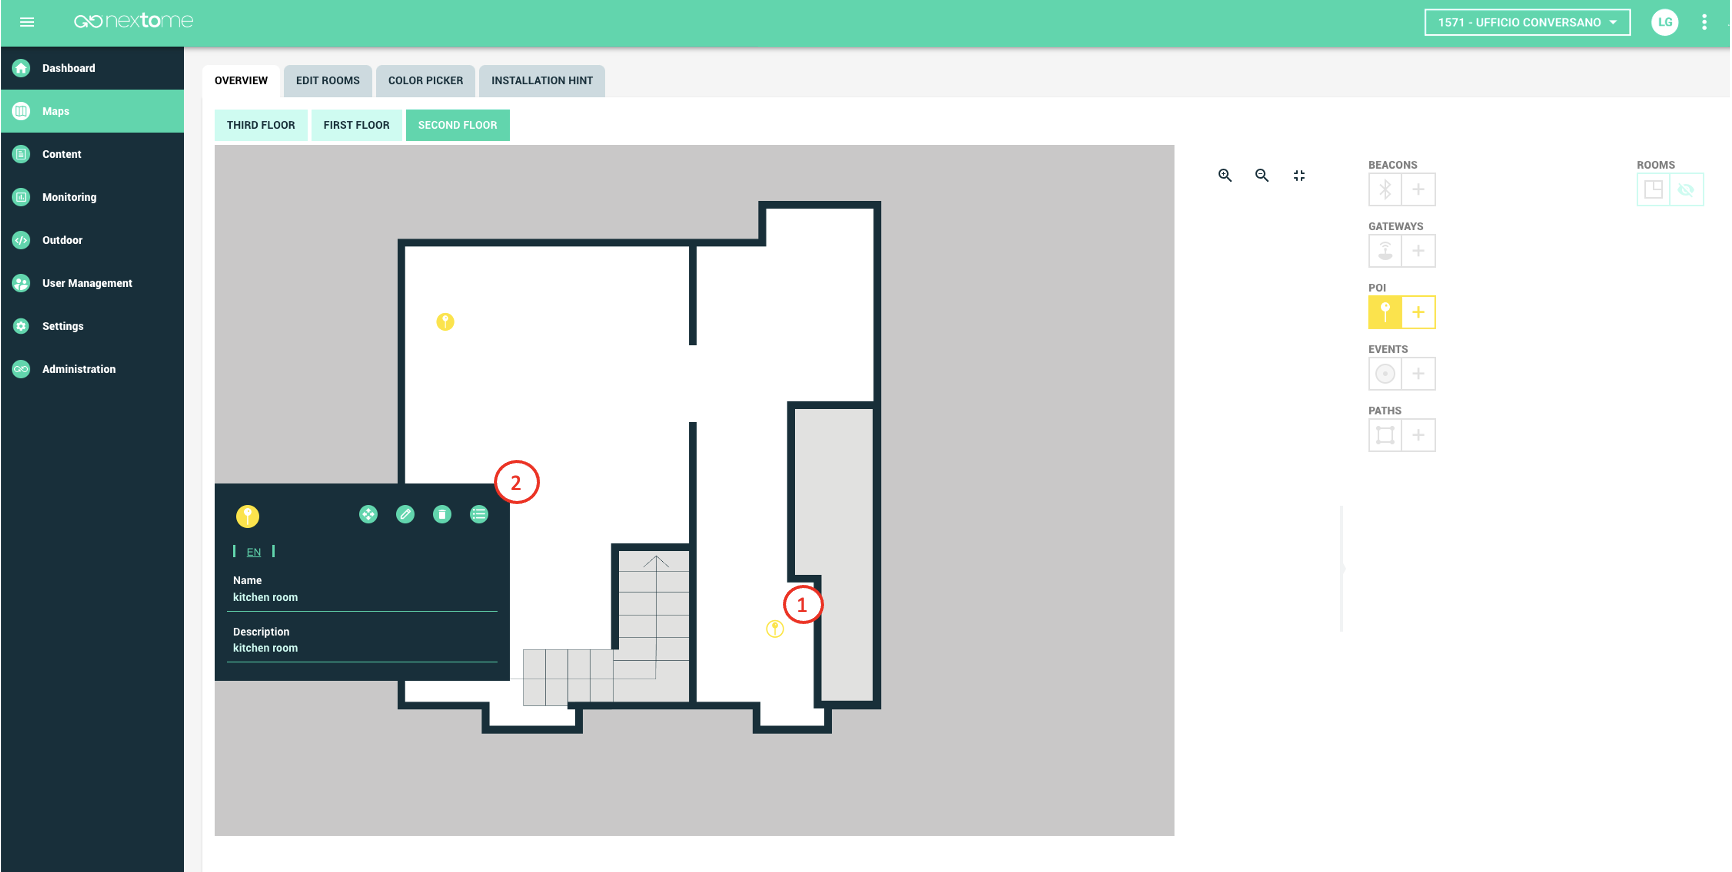
By clicking directly on the POI on the map (e.g., point 1 in Figure 10) it is possible to view its details or move, edit, or delete it through box 2 in Figure 10.
Fence Management
Smartphone Tracking
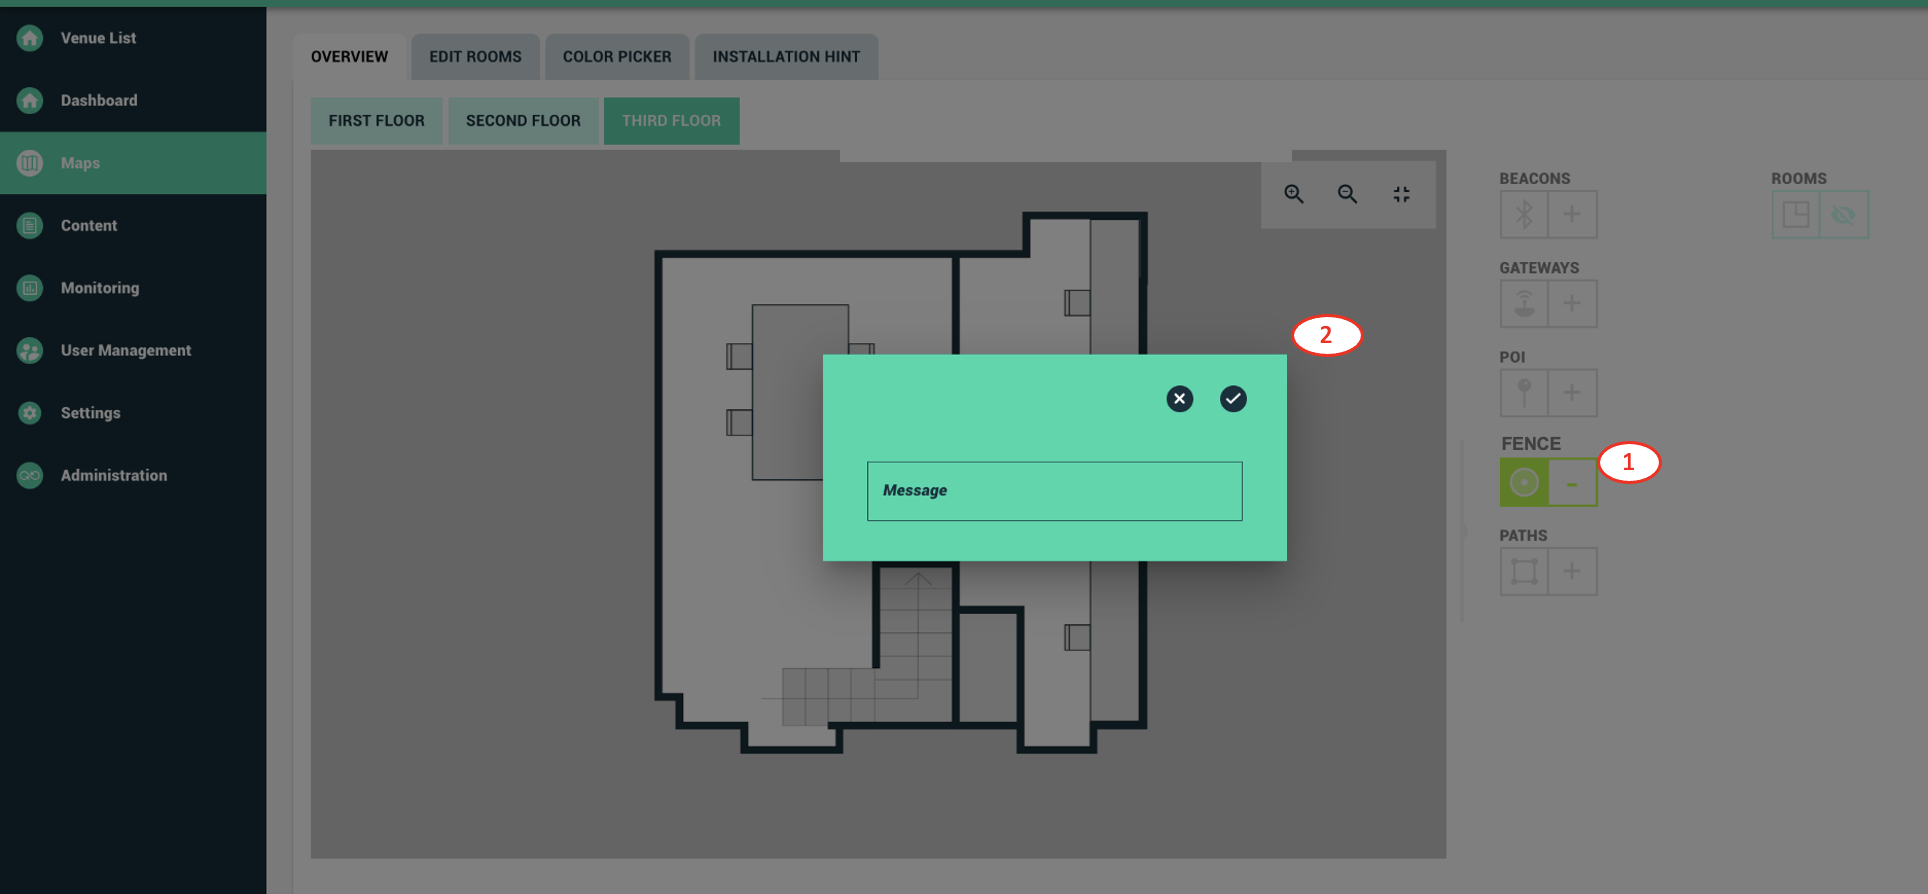
This section allows users to add circular areas within the map that identify zones within which the app user will receive a notification. To create an Fence area simply click on the '+' symbol close to the green events icon (point 1 in Figure 11), click the chosen point on the map, and finally enter the notification message in box 2 in Figure 11.
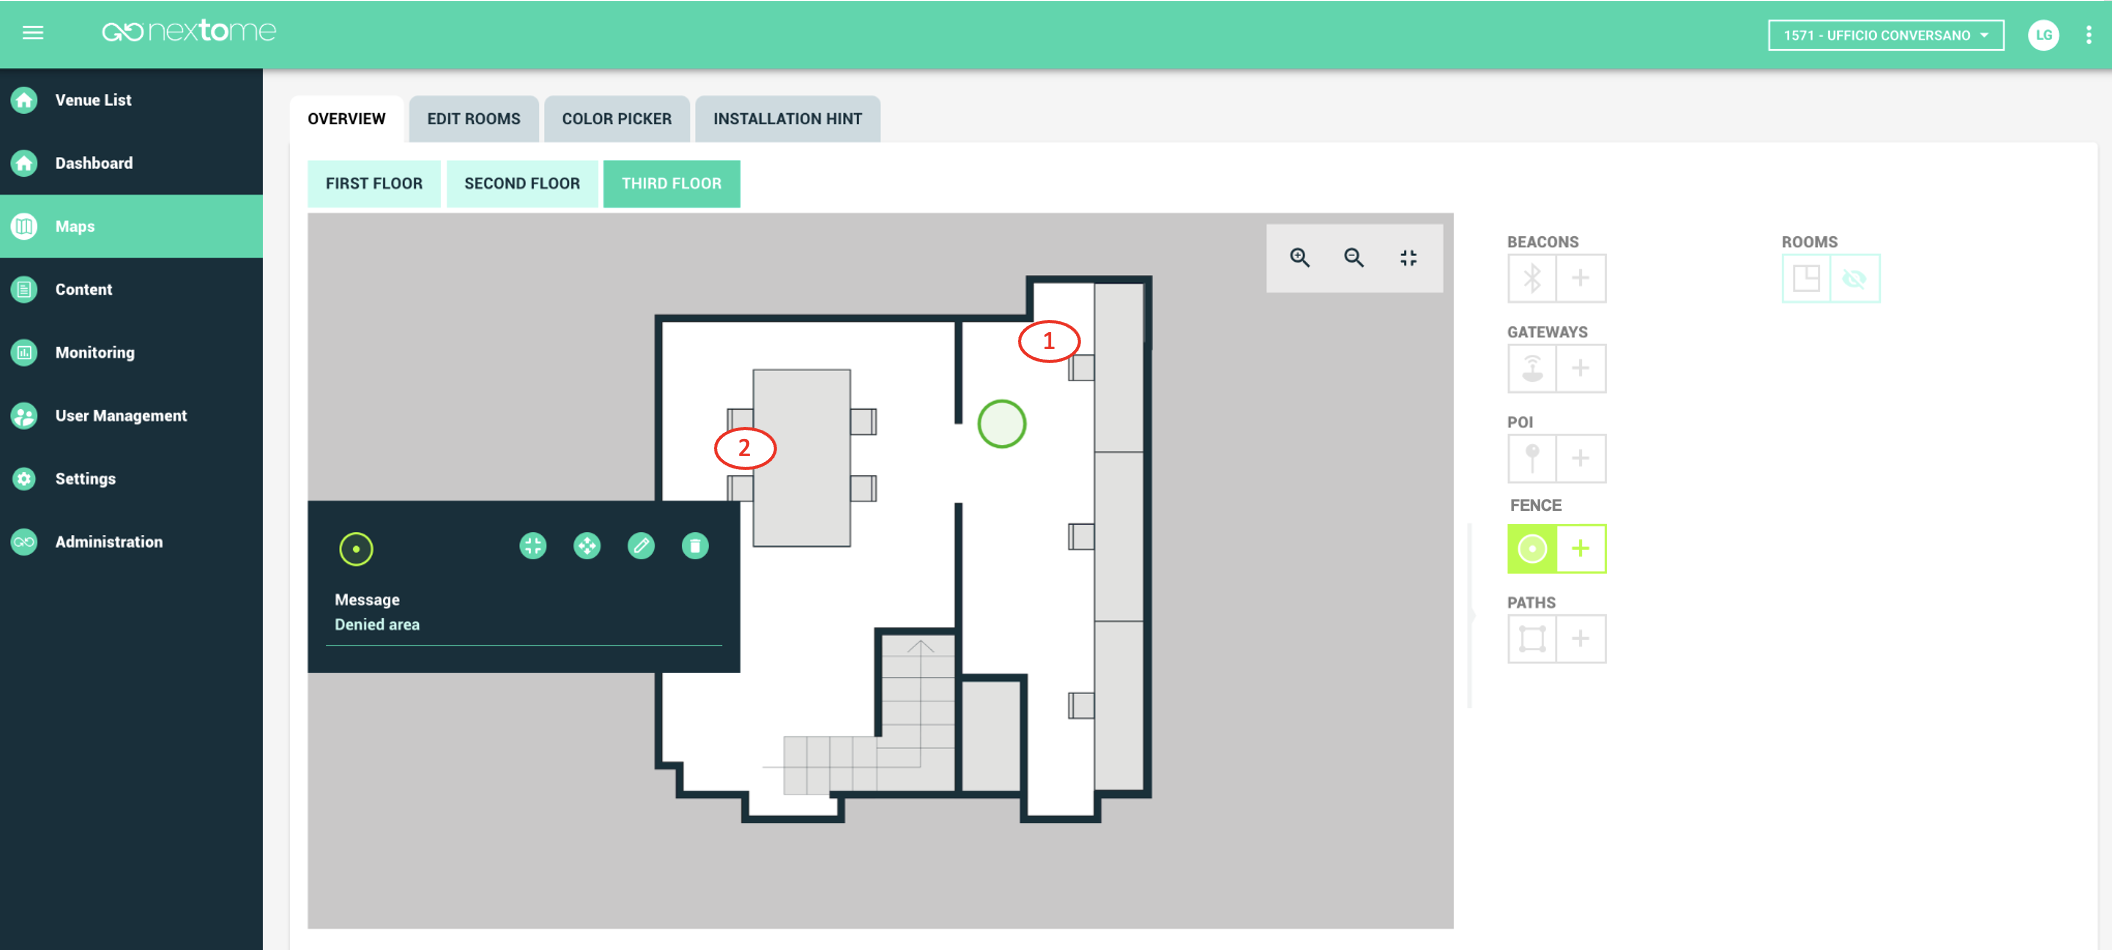
Once the center of the Fence area has been created, it can be enlarged, moved or deleted by clicking on the green circle in the map (point 1 in Figure 12) and taking advantage of the features in Box 2.
Paths
Smartphone Tracking
The creation of paths is closely linked to the navigation functionality. In fact, the creation of a given path binds the route suggested by the navigation in the app and ensures that the latter does not deviate from the path created via Nextome Hub Web. A route is a set of points and links between them. Points are created by clicking on the '+' symbol close to the paths icon and then on the chosen point in the map (points 1 and 2 in Figure 13). Links are created by clicking on one of the two points and using the functionality in Box 3.
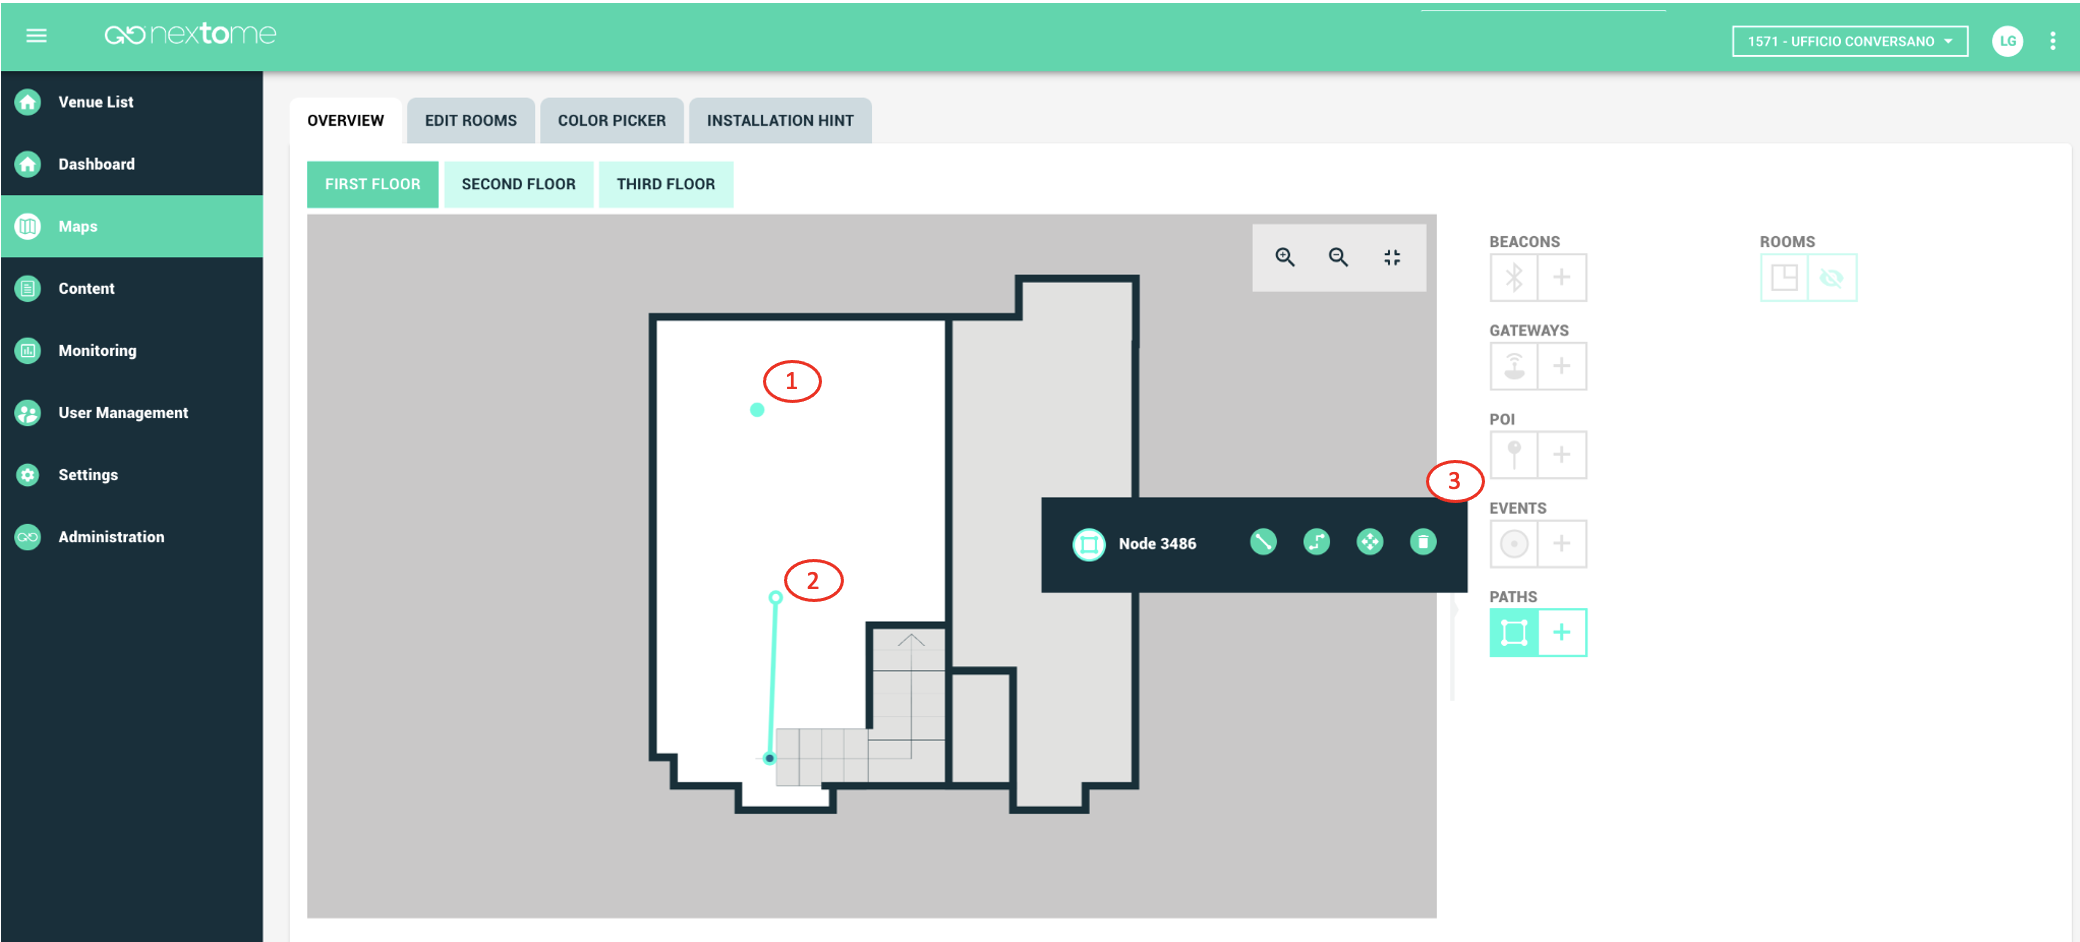
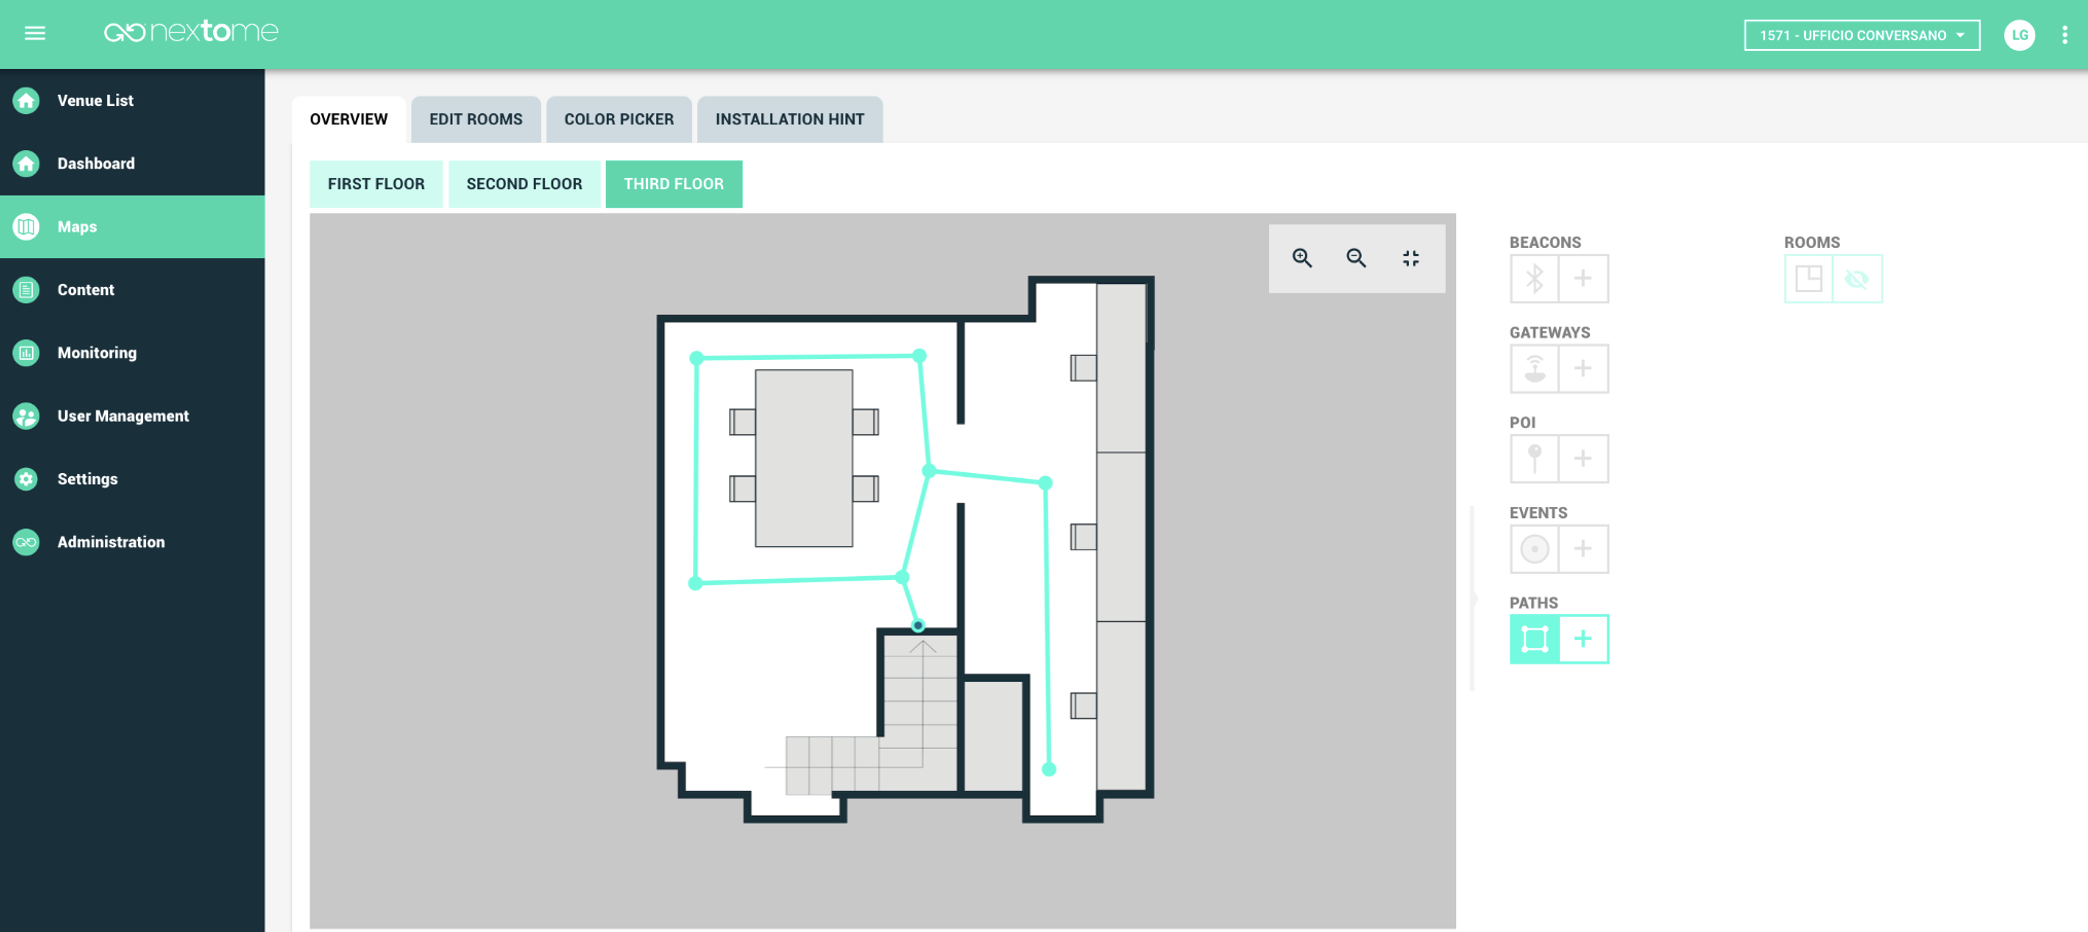
Figure 14 shows an example of a path consisting of a set of points and connections.
Visualize room
Smartphone Tracking Tag Tracking
In this section it is possible to visualize the rooms by clicking the symbol of the eye close to the room icon. The screen reported in Figure 15 shows the rooms on the second floor.
In the following section, a focus on the creation of the ‘room’ is given together with some detail about its utility.
Edit rooms
Smartphone Tracking Tag Tracking
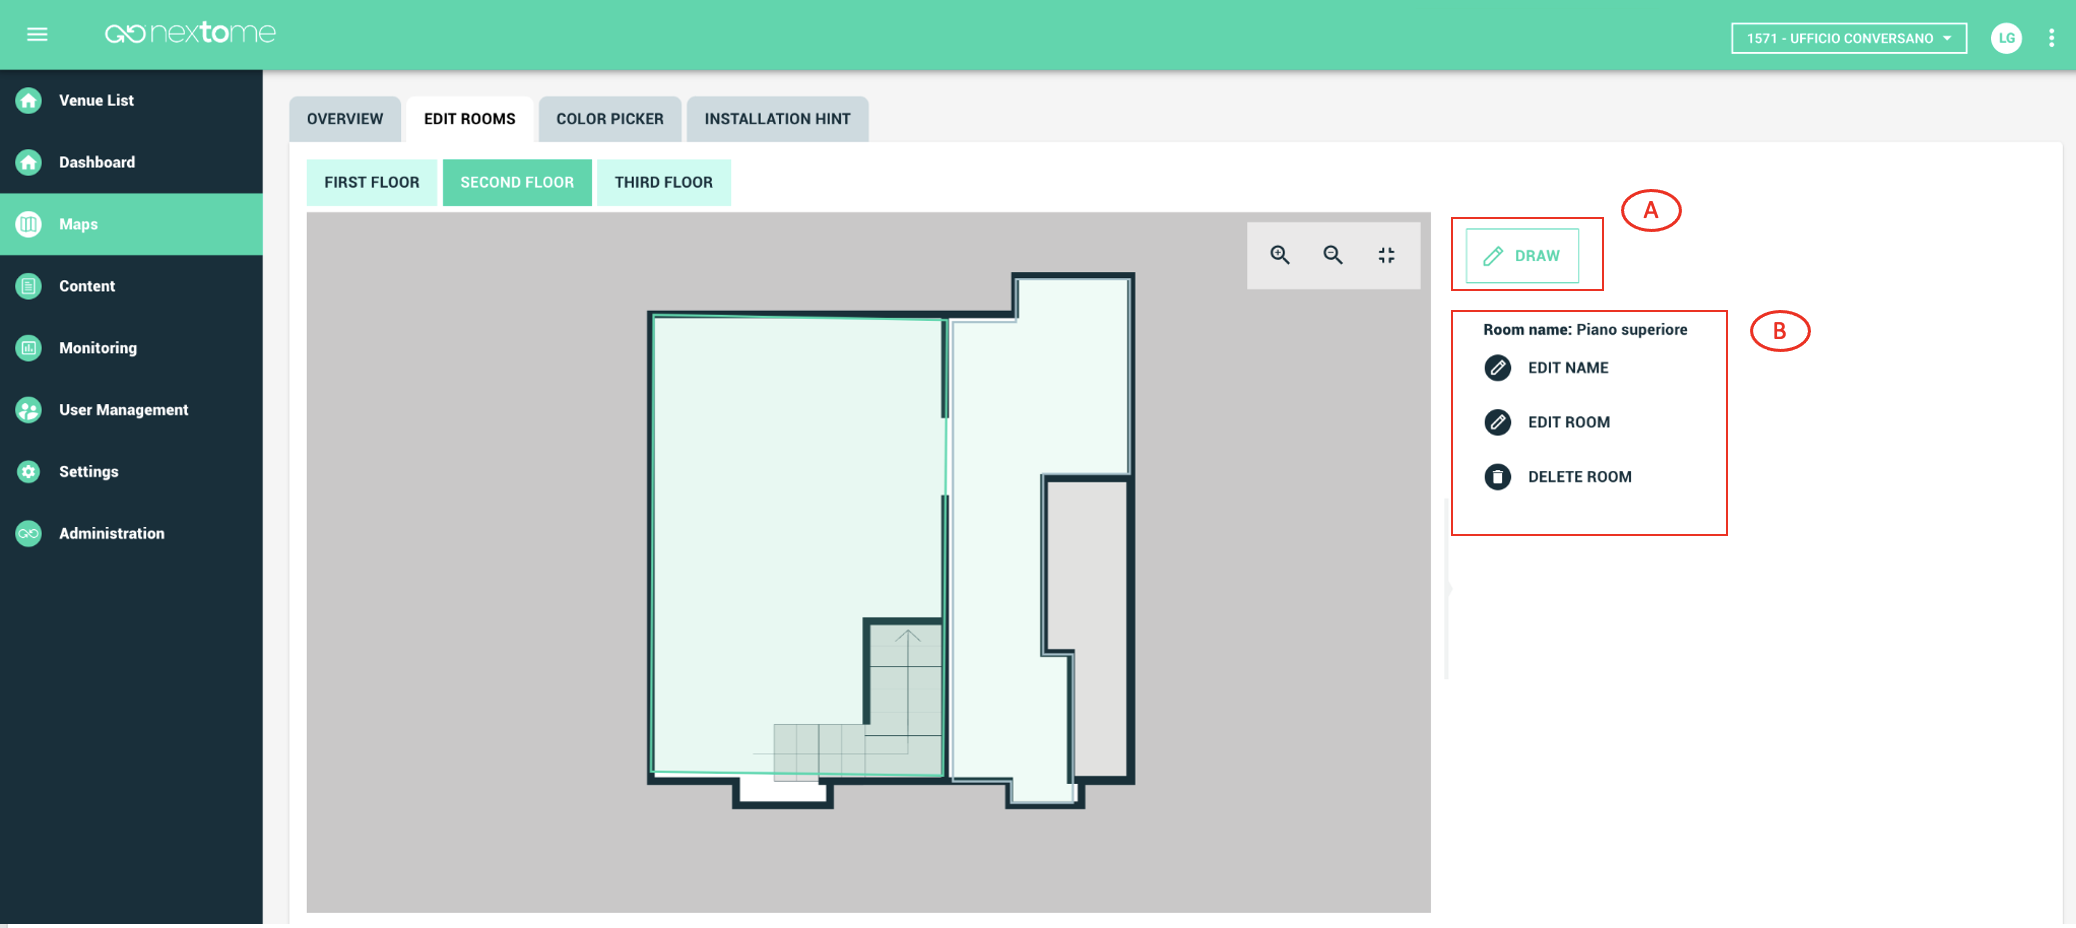
The 'EDIT ROOMS' section is dedicated to room management. The room object consists of a polygonal sub-portion of the map, which can correspond to a physical room or to a functional subdivision of the environment. When the map is divided into rooms, created in this section, each calculated position of the object or smartphone located by the Nextome technology is automatically associated with the room in which it is located. This enables the possibility of performing a subsequent analysis on the data by exploiting information on the movements between the various rooms.
Using the box A shown in the screen in Figure 16, it is possible to manually create a room. In fact, by clicking on 'DRAW' it is possible to create a polygon vertex by vertex and associate a name to it. By clicking instead on an already existing room, it is possible to modify or delete it using the functions in box B in Figure 16.
Color Picker
Smartphone Tracking Tag Tracking
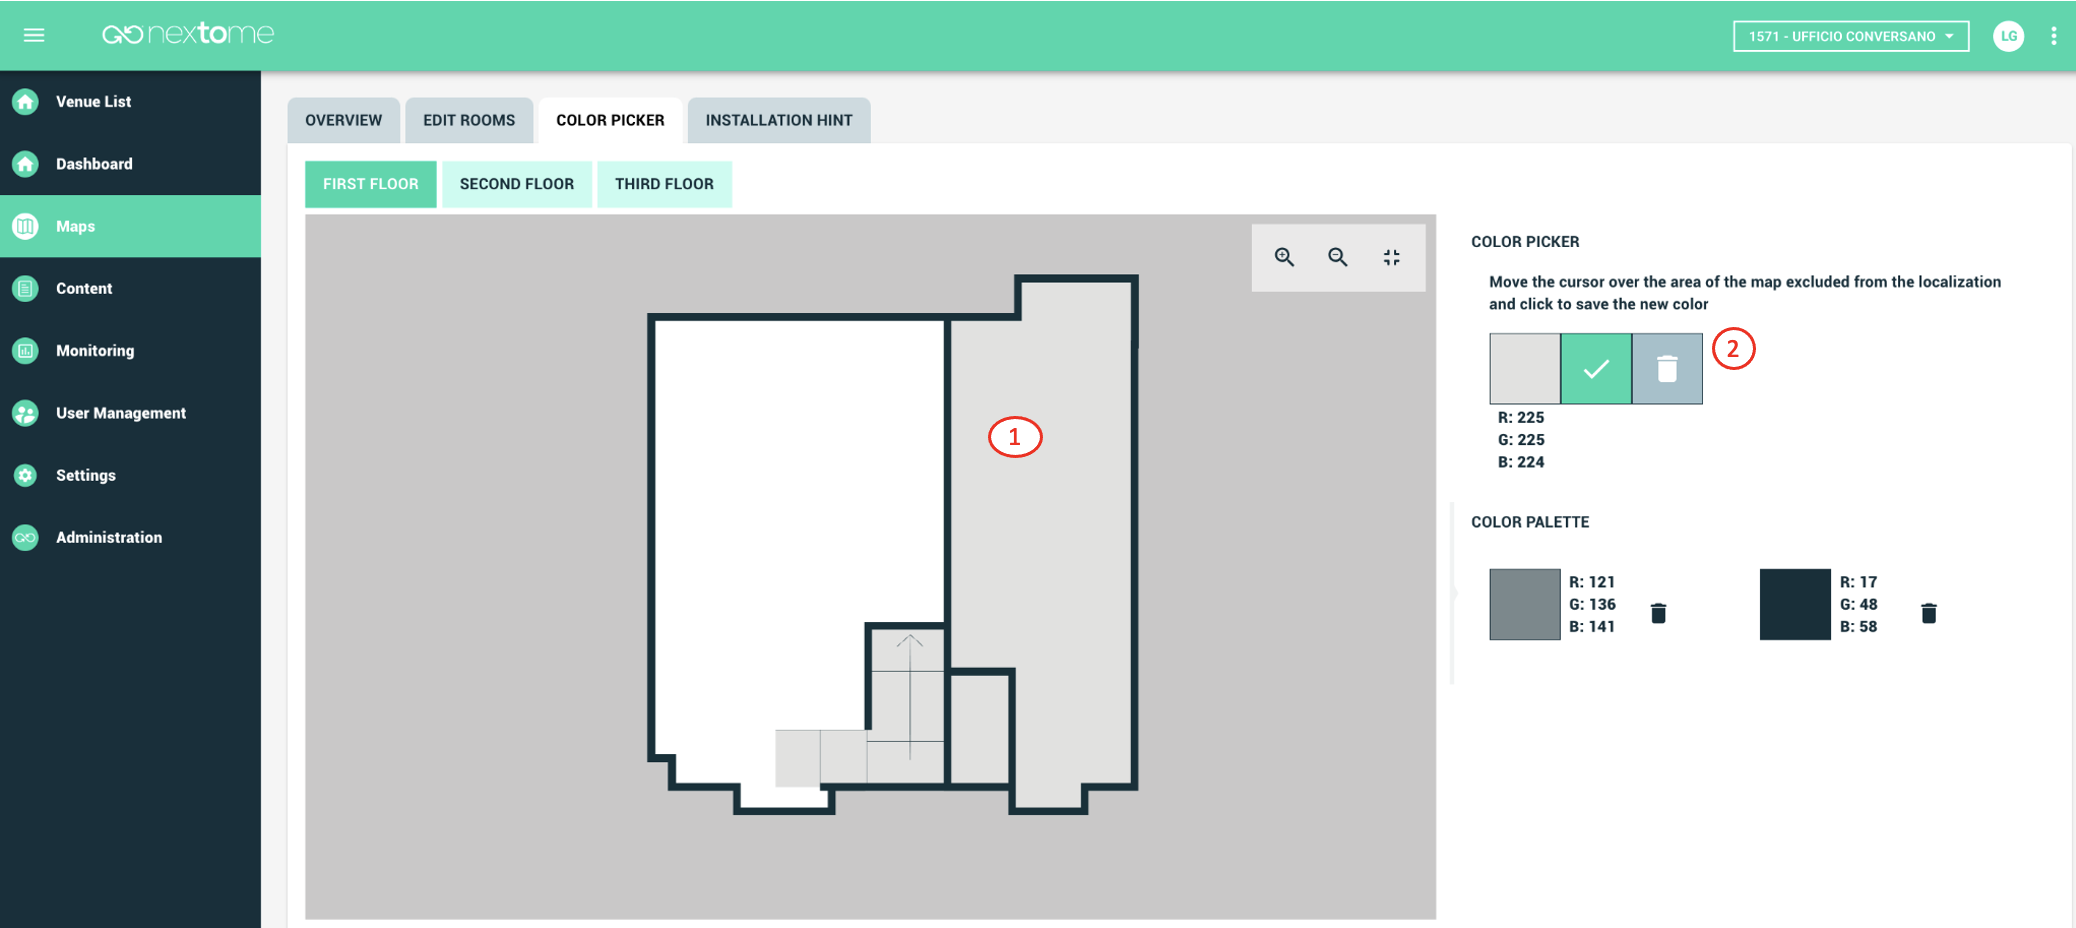
In the 'COLOR PICKER' section it is possible to define, usign colors, the non-walkable areas within the map, i.e., the parts of the environment within which you would not like the tag or the smartphone to be located. To register a color to which the 'non-walkable' characteristic will be associated, it is sufficient to click with the cursor on the chosen area and, then, confirm with the icon indicated by the number 2 as shown in Figure 17. In the latter figure, infact, it can be seen that the color of the table has been added as 'non-walkable', all the areas of that color have therefore become unwalkable, as well as the gray of the area surrounding the map and the dark gray of the walls. In this case the calculated position of the tag or smartphone will never be positioned within the gray areas and on the walls.
Installation Hint
The 'INSTALLATION HINT' section is aimed above all at the Nextome team that deals with the coverage study and the estimation of the number and position of the sensors to be installed.
Content
The 'Content' section allows you to manage the objects created through the 'Maps' section and to create new ones. A screen is dedicated to each type of resource which will be detailed below.
Maps
Smartphone Tracking Tag Tracking
The maps screen, in Figure 18, shows the details of each map added within the selected venue '632 - UFFICIO CONVERSANO'. The following functions are available for each map: 'download', 'modify', 'delete'. it is also possible to add a new map by clicking on 'ADD NEW'.
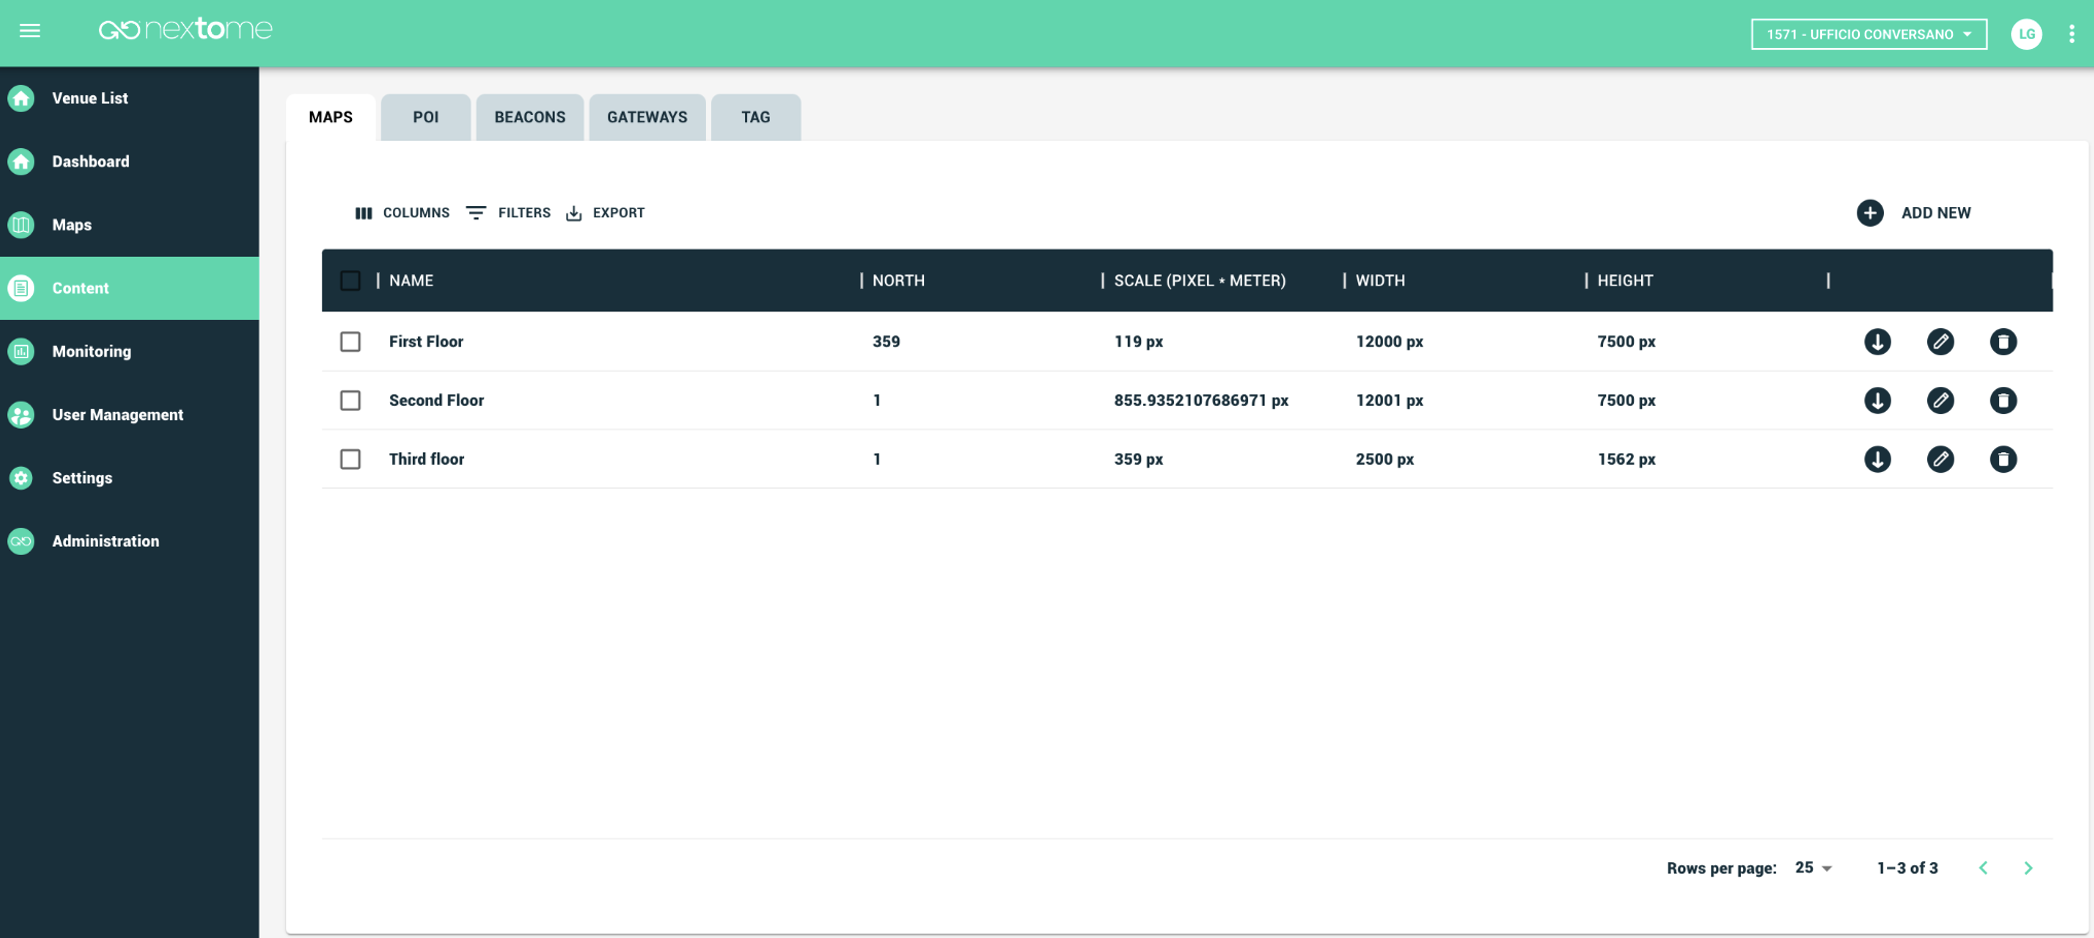
Please note that deleting a map results in the loss of all resources linked to it, including the calculated positions.
Beacons
Smartphone Tracking
The screen relating to the 'BEACONS' resource allows you to monitor the battery level of the Beacons installed in the structure and view the other information in the form of a table. This screen is dedicated only to the sensors that act as reference anchors, i.e., those registered in the relevant 'Maps' section. The 'TAG' screen is dedicated to the sensors associated with objects or people to be located.
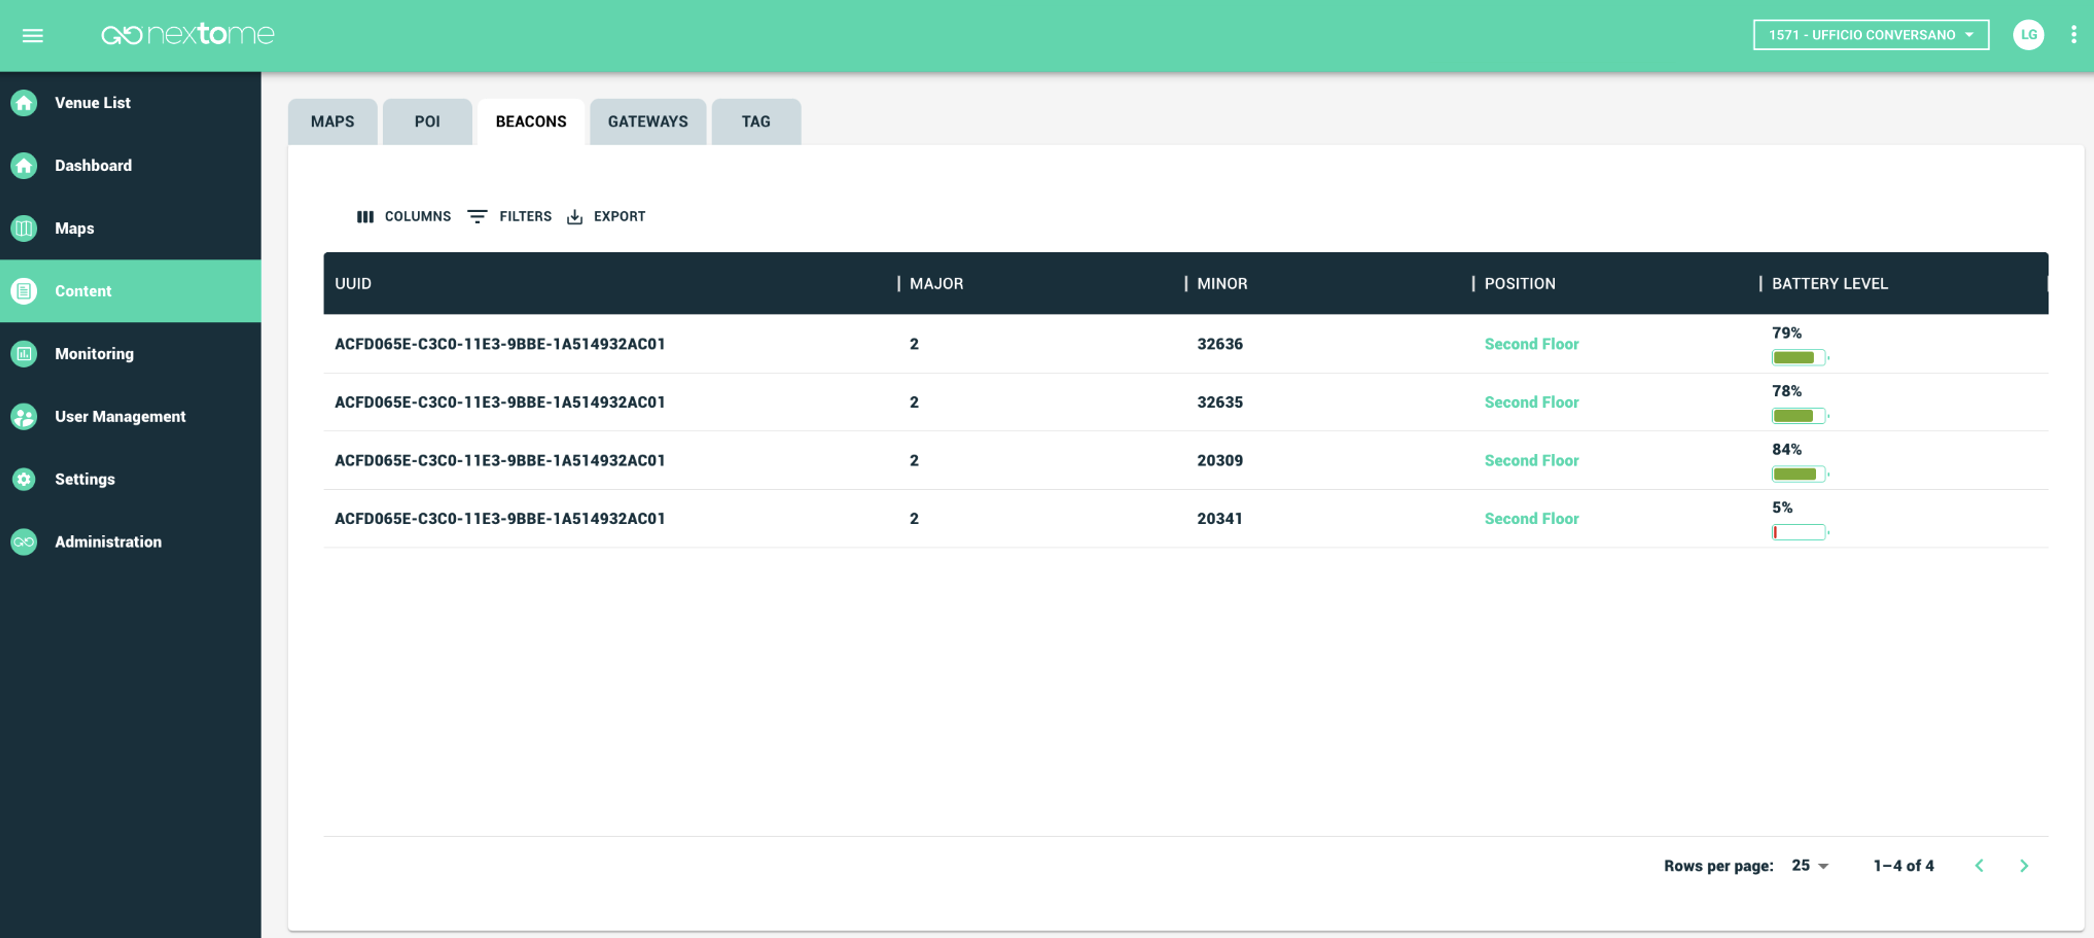
Note
The battery level is only available for Android. The IOS SDK does not provide this functionality.
Gateway
Tag Tracking
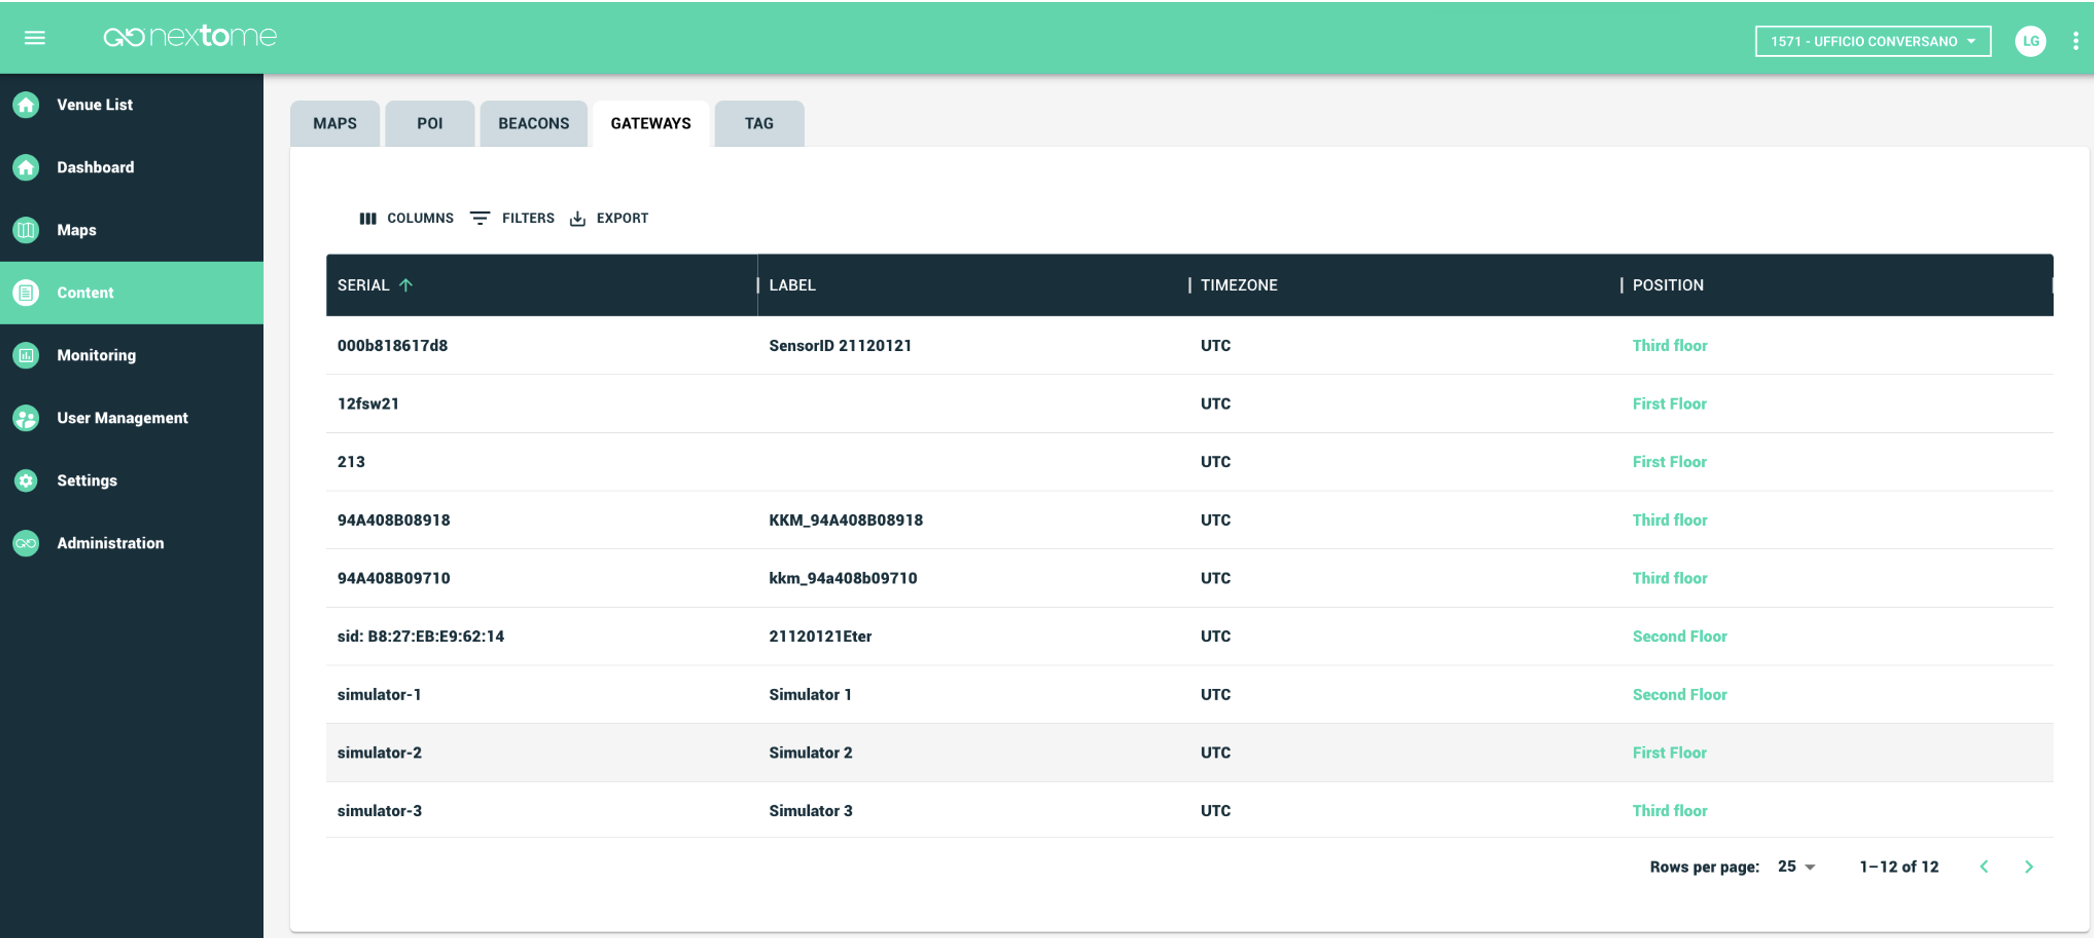
The screen relating to the 'GATEWAYS' resource allows you to consult, in tabular form, the information relating to the Gateways registered in the 'Maps' section.
Tag
Tag Tracking
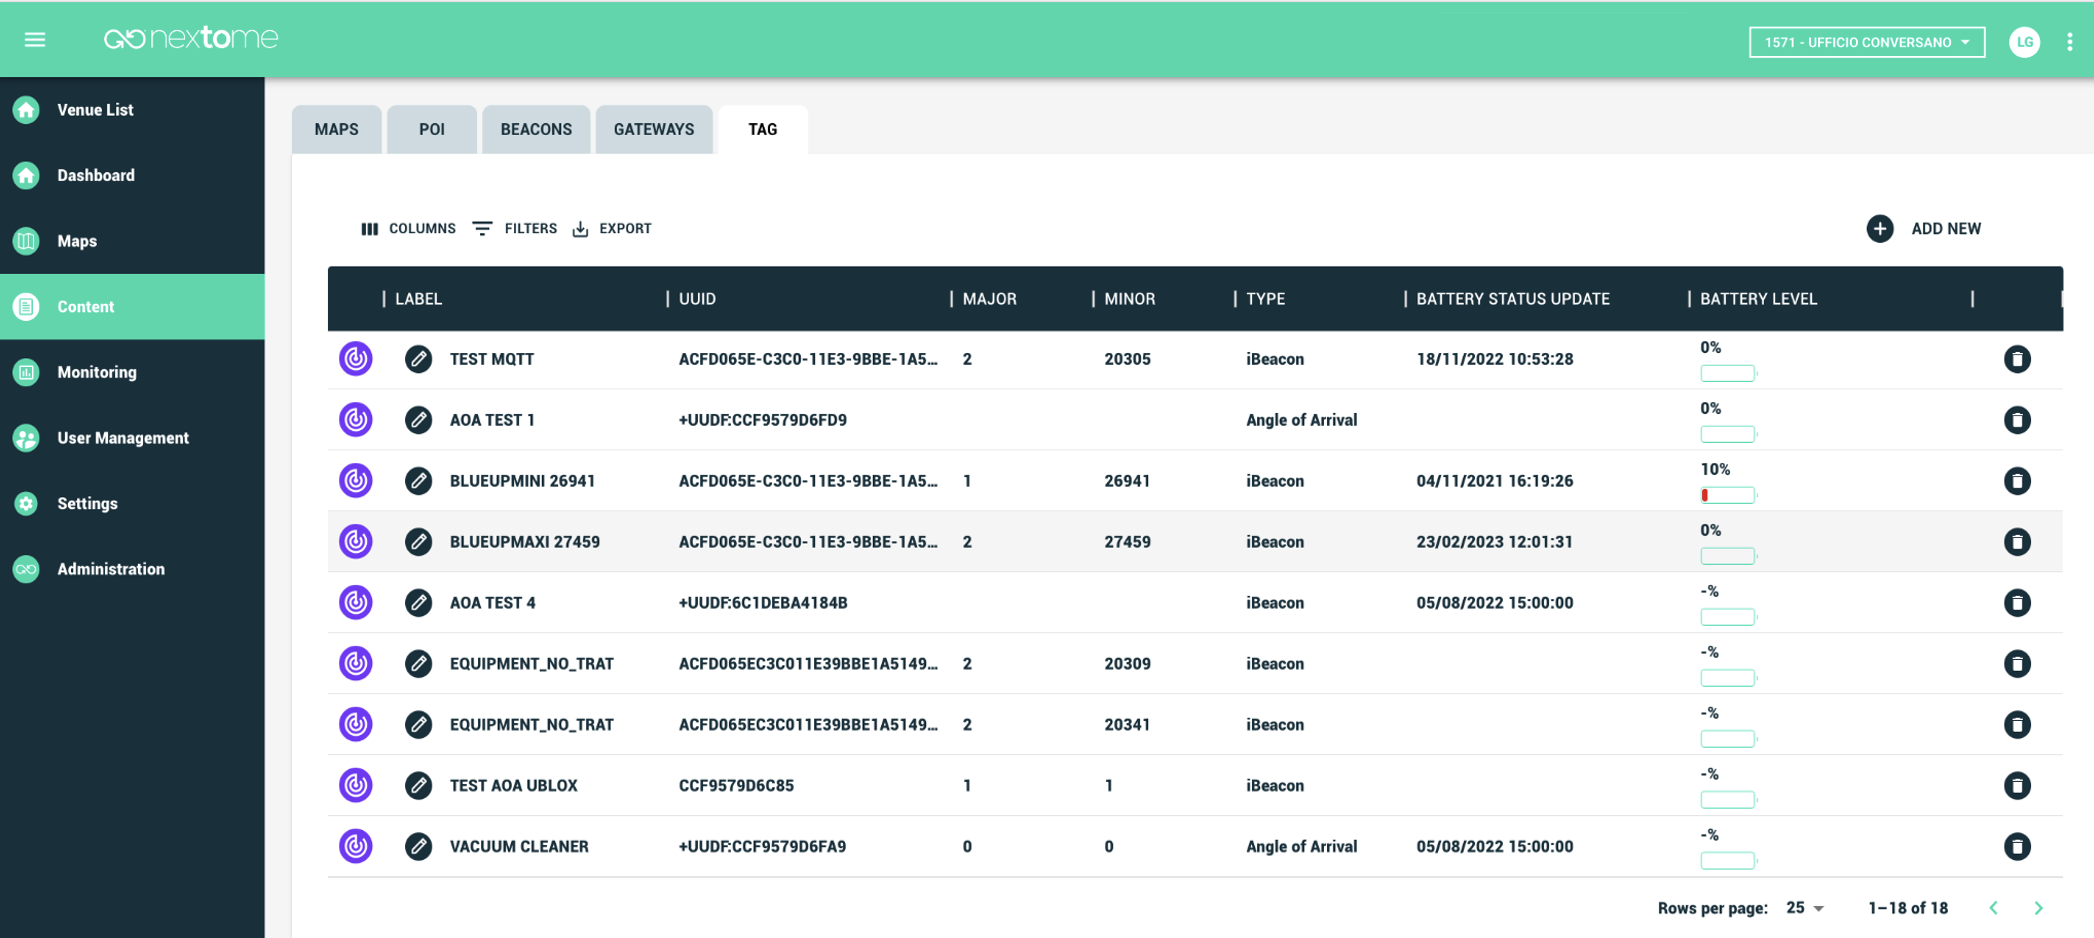
This section allows you to manage the Beacon tags associated with objects/people to locate. Note that the addition of this resource is not present in the maps section, as a tag to be located cannot be associated with a specific position on the map during registration, precisely because it is a tag whose position is not known. Tags of this type are then associated with the Venue they are located in. Nextome technology allows you to locate the map and position where they are. The registration of this type of tag is carried out exclusively through the current section. Figure 21 shows the table containing all the tags to locate present in the venue '632 - UFFICIO CONVERSANO'.
By clicking on 'ADD NEW' a new tag can be registered through the screen highlighted in Figure 22. The choice of selection between 'Asset' and 'People' depends on the use made of the tag and determines the label that will identify it.
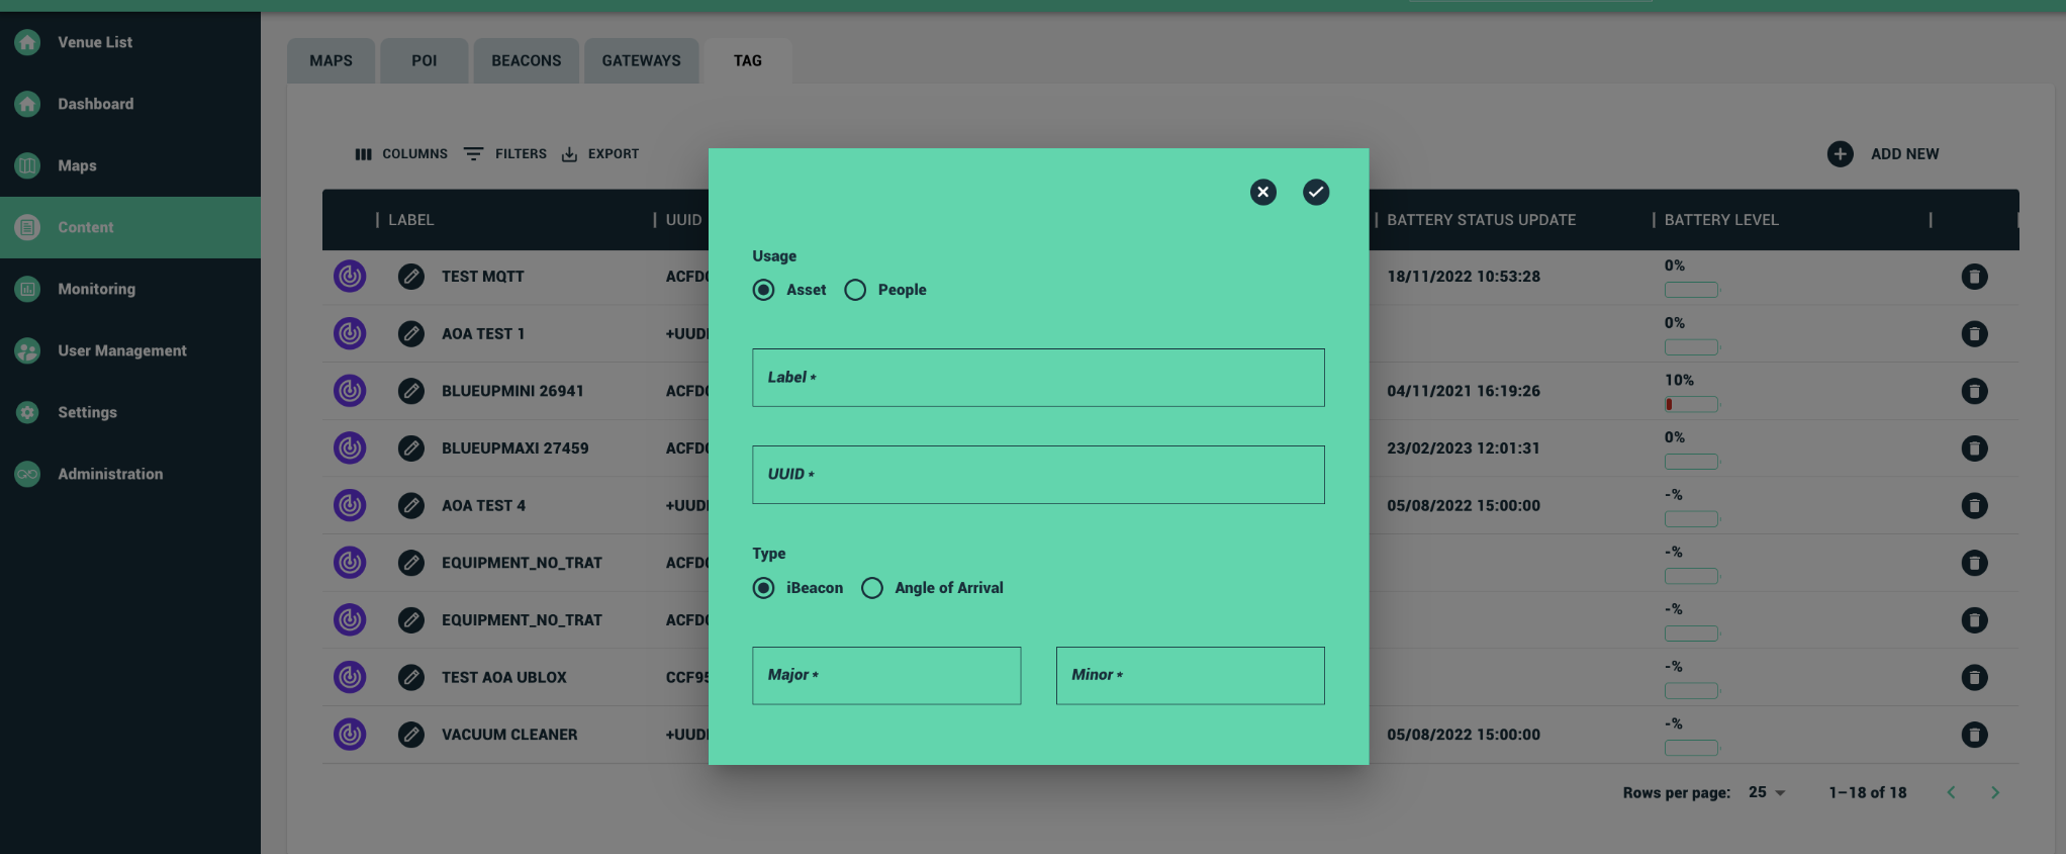
Figure 23 shows the two labels which represent, from left to right, a tag associated with a person and a tag associated with an object.

Note
The battery level information is available only on gateways produced by selected suppliers.
Monitoring
Smartphone Tracking Tag Tracking
The current section is dedicated to displaying the resources that are localized by the Nextome technology in the selected venue. The resources can include tags associated with people or objects, respectively indicated by the PEOPLE and ASSET icons in magenta and purple, or smartphones indicated by the relative blue icon. Through the icons in box B in Figure 24 it is possible to enable or disable the display on the map of the resources located on the basis of their type. The position of the localized resources is visible directly on the map in box A. While the table, in box C indicates the time to which the last position calculated for the relative tag/smartphone is associated. Boxes A and B therefore show, for each tag/smartphone, the last calculated position, the first indicates the position on the map, the second indicates the sighting time plus some details of the located tag/smartphone.
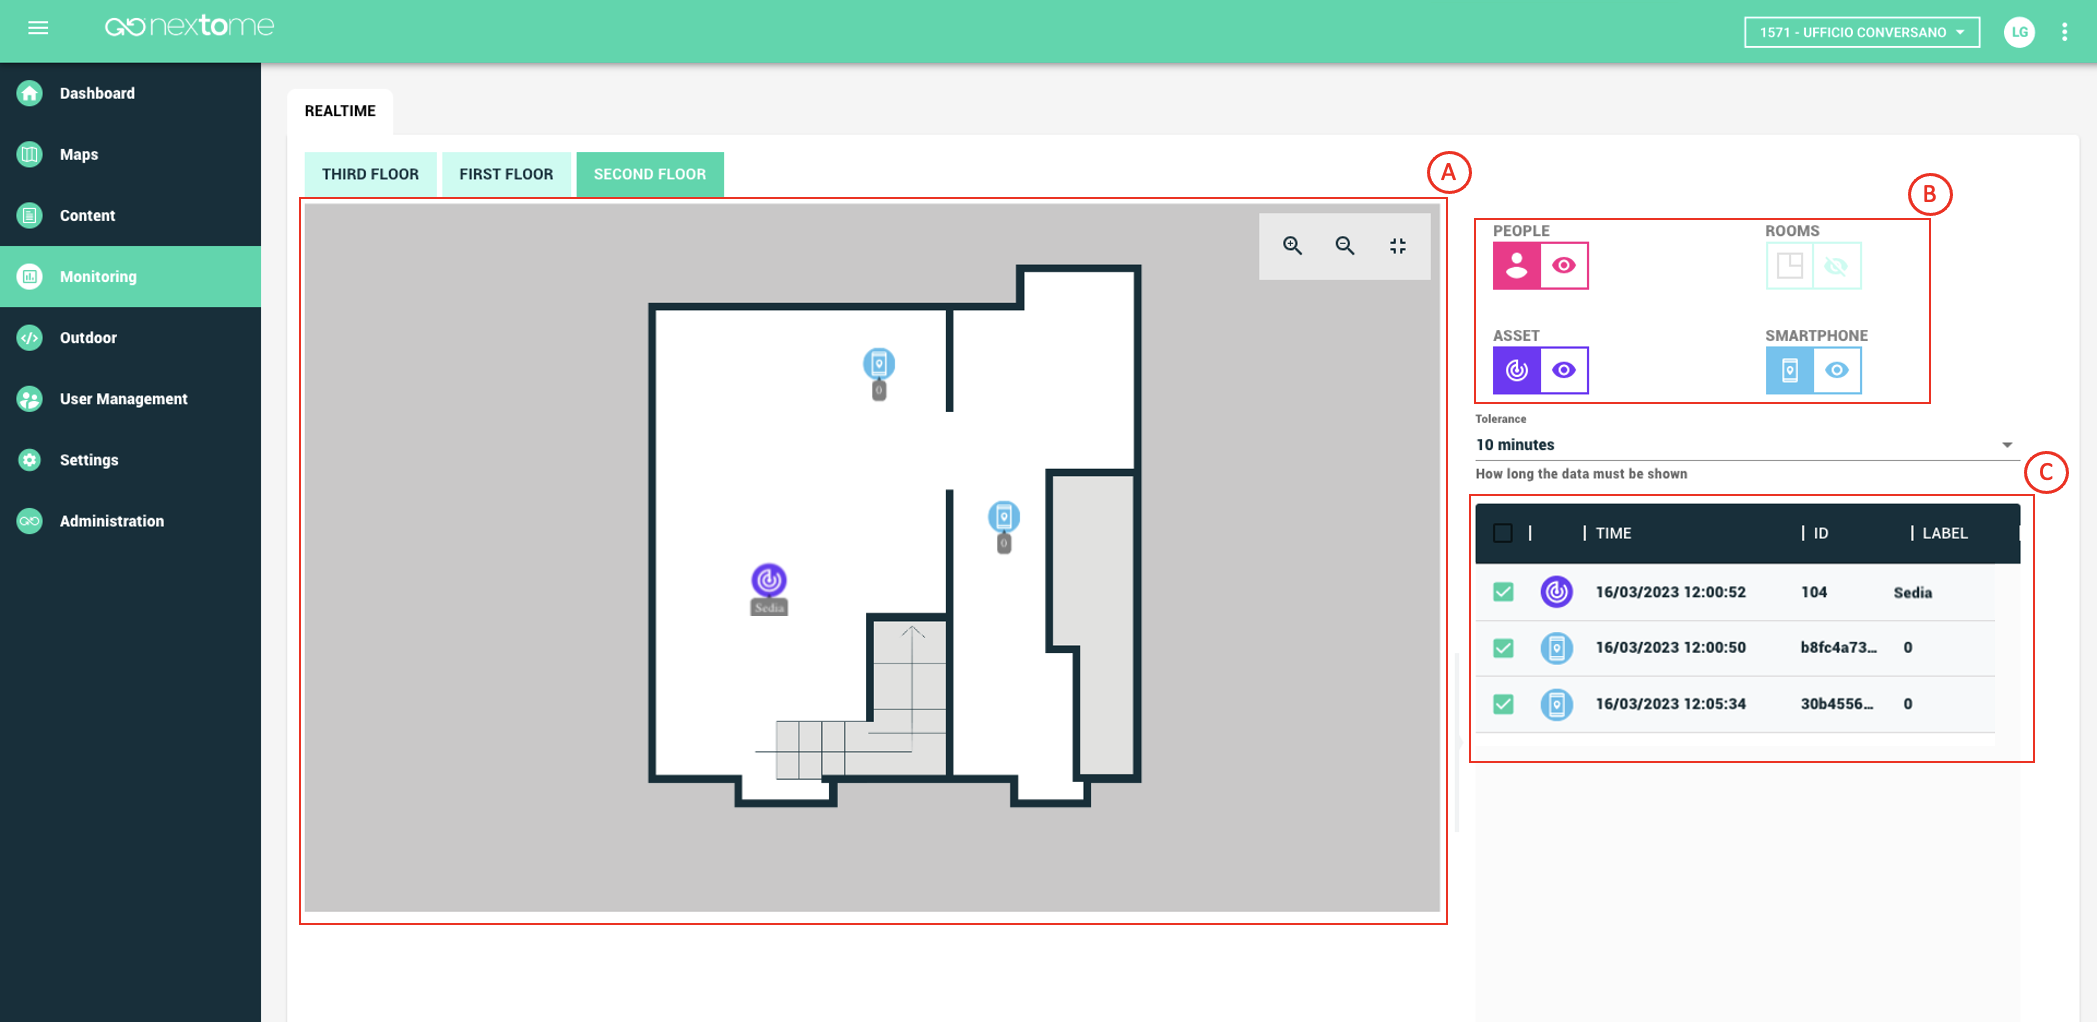
Please note that, from the details associated with the smartphone, it is not possible to trace the specific mobile phone as the device ID is a randomly generated string. Please note that for privacy reasons, the positions of the smartphones will not be visible on the portal, except in specific cases where the situation permits it. An example may be the case in which smartphones are not associated with people, but with objects, for example trolleys.
User Management
Smartphone Tracking Tag Tracking
The 'User management' section allows you to add a new user or modify existing ones. Note that the users managed in the current section refer to the selected Venue. For example, the users shown in the screenshot in the figure will only have access to Venue '632 - UFFICIO CONVERSANO'. The red box in Figure 25 shows the details of the user with the related permissions.
Like the other sections, this too depends on the permissions associated with the user with whom you access the portal.
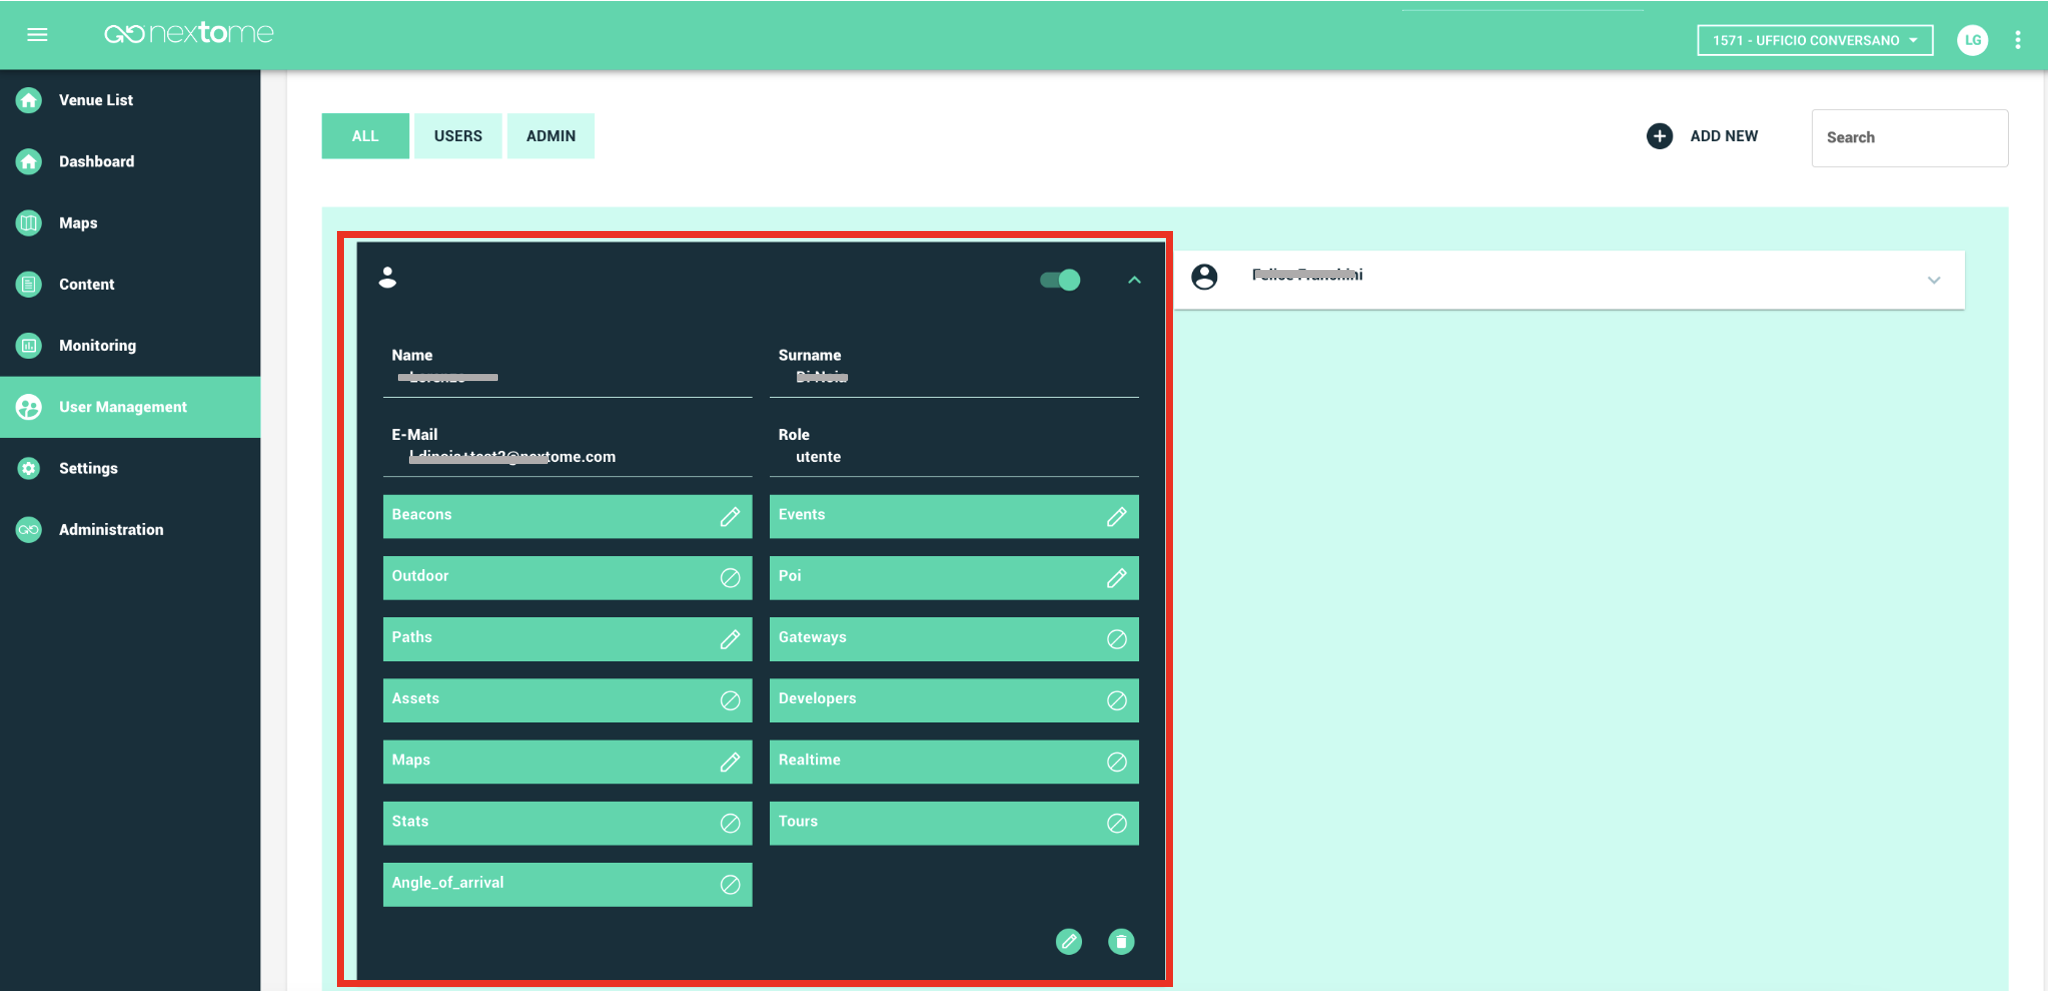
Once a new user is created, an email is sent to the associated address which enables the user to create his own password.
Settings
The settings section allows you to act on localization solutions on various levels. Below is a discussion of each of the types of settings.
Generals
Smartphone Tracking Tag Tracking
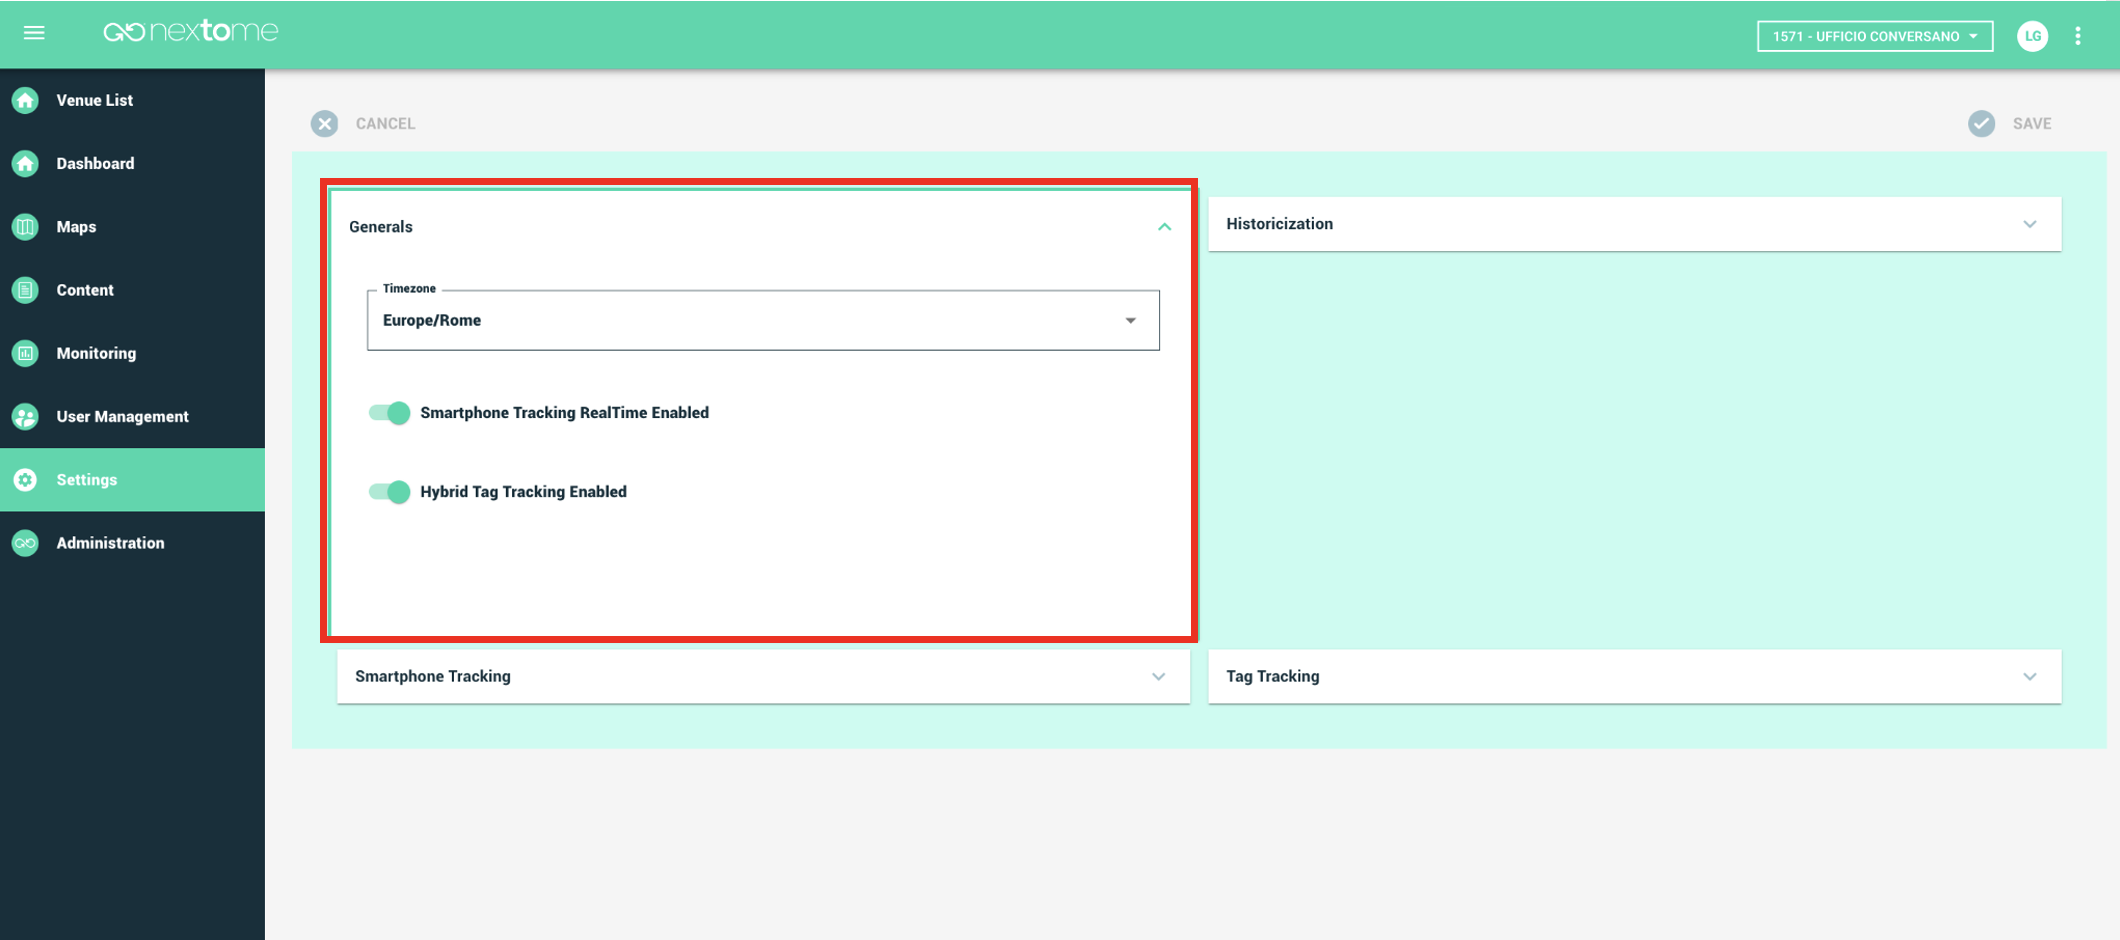
Below is the explanation for each of the items available in the box in Figure 26:
- Timezone → Allows the selection of the time zone associated with the Venue.
- Real-time smartphone tracking enabled → Allows you to save the smartphone positions that are calculated by the app, the positions can then be displayed on the portal within the limits of the permissions related to the user.
- Hybrid tag localization enabled → Allows the smartphone on which the app is installed to detect the tags registered in the 'Resource management >> Tag' section.
Historicization
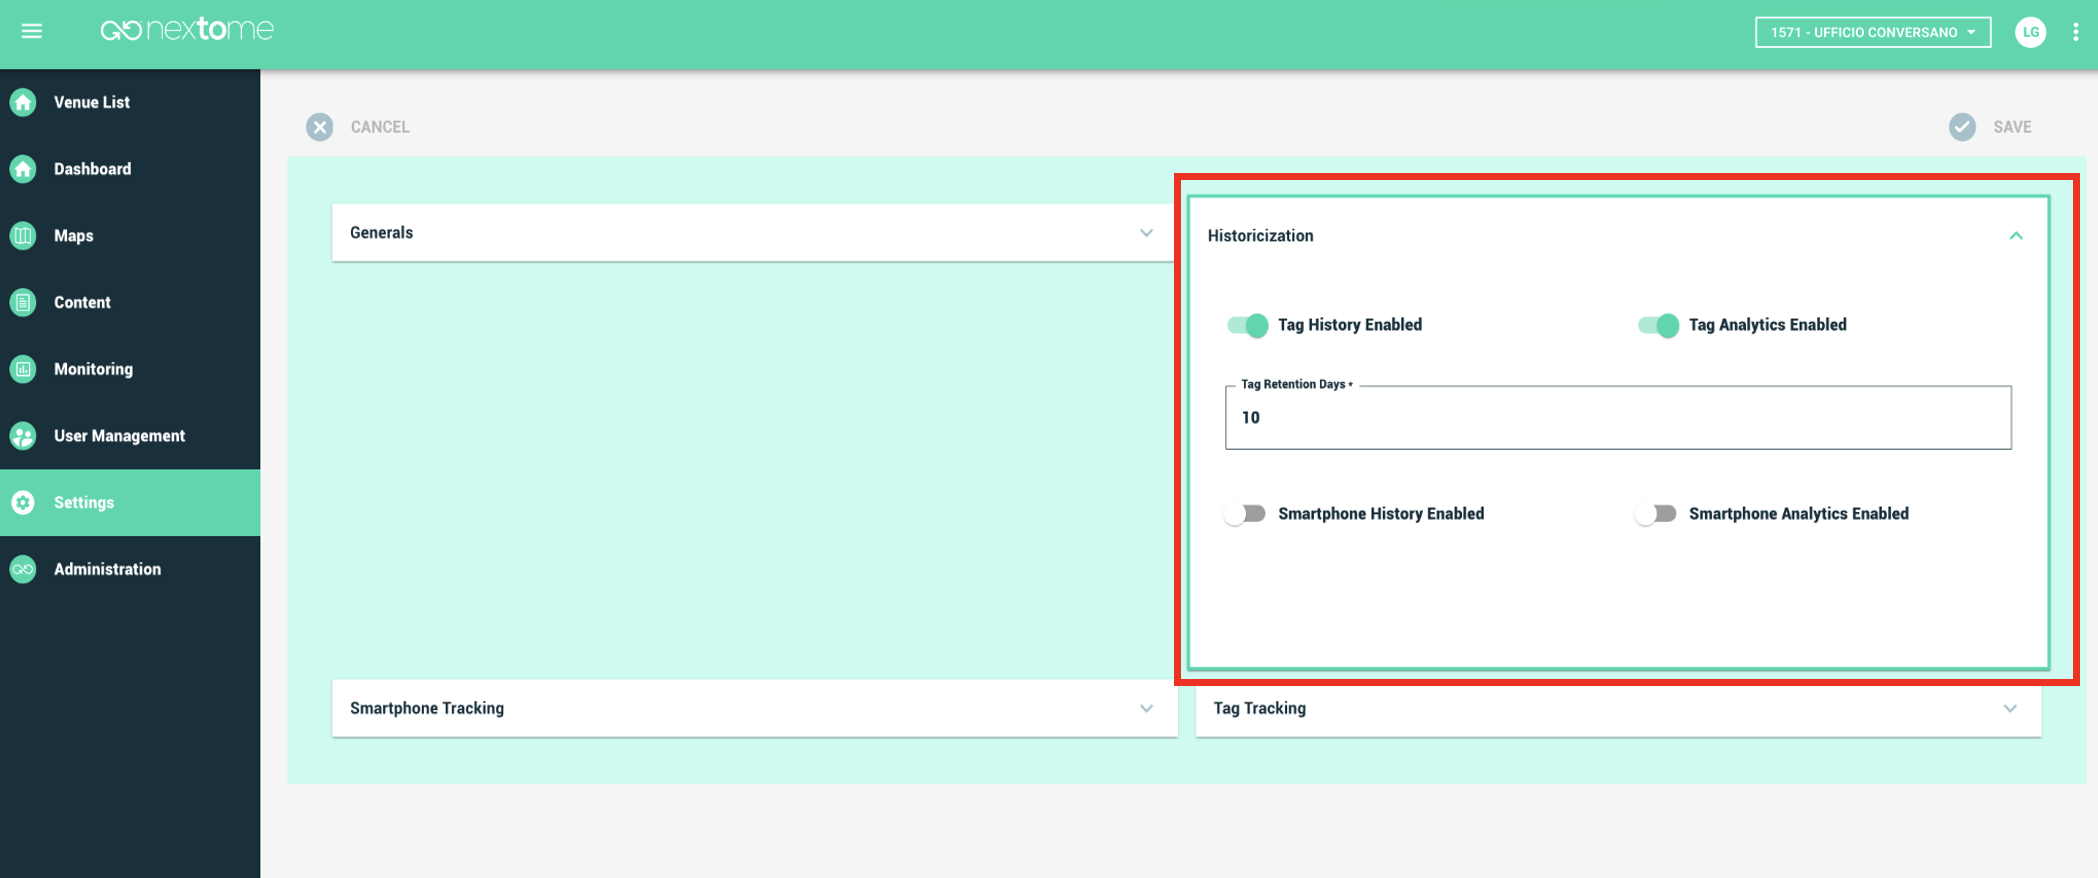
The settings in the box in Figure 27 allow you to manage the data retention methods and are specific for each of the two localization solutions 'Tag History enabled' and 'Smartphone History enabled.
Historicization settings for tags
Tag Tracking
Below we delve into the first three settings related to Tag tracking. By default the tag positions calculated by the server are sent to the server and therefore the display of the calculated positions in real time on the portal is always available. As with smartphone locations (which we'll cover in the next section), tag locations can be subject to the following features:
- Historicization.
- Calculation of metrics on aggregated and processed data.
To manage functions 1. and 2. it is possible to use the settings relating to tag tracking inside the box in the figure and described in the following table:
| Option | Description |
|---|---|
| Tag historicization enabled | If enabled → the data of the tag positions are kept in a history table for a limited period, defined by the value of 'Days to keep the tag data'. The data can be consulted through the dedicated API call relating to the historical data of the assets. If disabled → The asset history data API call is not available |
| Tag retention days | If ‘Tag history enabled’ is enabled → Number of days to keep. For example, if 'Tag retention days' = 6, the positions present in the history table and available to the user will be those relating to the 6 days prior to the current day. NB the cancellation procedures start at 12 UTC of each day, therefore in the case of the example, at 12 UTC on January 8th the positions relating to January 1st and the previous days would be cancelled. If 'Tag history enabled' is disabled → 'Tag retention days' cannot be configured because it loses its meaning |
| Tag metrics enabled | If enabled → the position data is processed daily and is available within the possible Business Intelligence visual objects. The procedures that process the data and aggregate them start every day at 12 UTC and deal with the previous day's data. Then every day after 12 UTC the possible business intelligence visuals will contain information up to the previous day against which the analysis is being performed. If disabled → the Business Intelligence visuals will not be available |
Historicization settings for Smartphone
Smartphone Tracking
Let's take a closer look at the settings relating to Smartphone tracking below By default, the positions calculated by the app installed on the smartphone are not sent to the server and therefore cannot be subject to the following functions:
- real-time positions view on the portal
- historicization
- calculation of metrics on aggregated and processed data
To enable the function 1. it is therefore necessary to enable 'Real-time smartphone localization enabled' in the General settings in the figure. To manage functions 2. and 3. it is possible to use the settings relating to smartphone tracking within the 'History' box in the figure and described in the following table.
| Option | Description |
|---|---|
| Smartphone history enabled | If enabled → the position data is kept in a history table for a limited period, defined by the value of ‘Smartphone retention days'. The data can be consulted through the dedicated API call relating to historical data. If disabled → The historical data API call is not available and the 'Data retention days' setting is not configurable |
| Smartphone retention days | If ‘Smartphone history enabled’ → Number of days to keep. For example, if 'Smartphone retention days ' = 6, the positions present in the history table and available to the user will be those relating to the 6 days preceding the current day. NB the cancellation procedures start at 12 UTC each day, therefore In the case of the example at 12 UTC on January 8 the positions relating to January 1 would be canceled and so on. If 'Smartphone history enabled' is disabled → 'Smartphone retention days' cannot be configured because it loses its meaning |
| Smartphone analytics enabled | If enabled → the position data is processed daily and is available within the possible Business Intelligence visual objects. The procedures that process the data and aggregate them start every day at 12 UTC and deal with the previous day's data. Then every day after 12 UTC the possible business intelligence visuals will contain information up to the previous day against which the analysis is being performed. If disabled → the Business Intelligence visuals will not be available. |
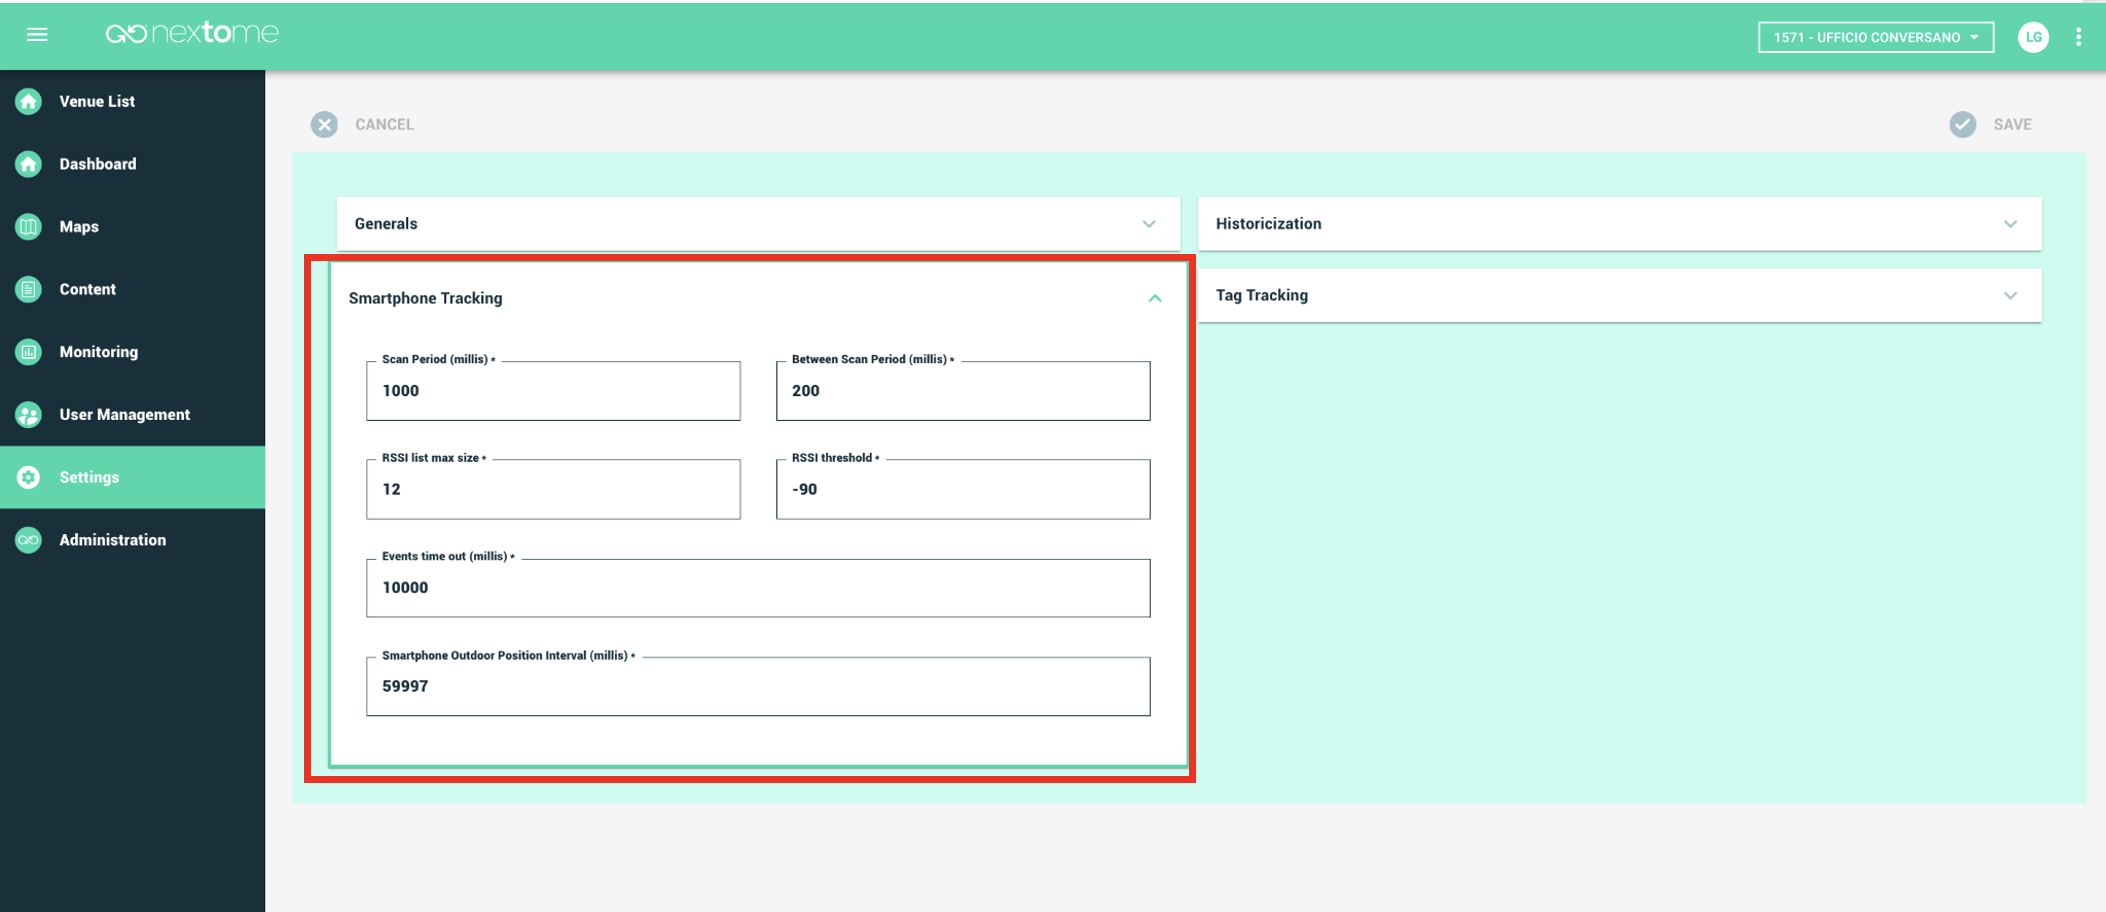
Smartphone tracking- Parameters
Smartphone Tracking
In the 'Smartphone tracking - Parameters' box it is possible to configure the values of the parameters that are used within the algorithm. it is strongly recommended to change these parameters only in agreement with the Nextome team. Below is the explanation for each of the items available in the box in Figure 28: - Scan Period → Bluetooth scan time in milliseconds to detect new beacons. - RSSI list max size → Maximum number of detections for each beacon that are used in the calculation of the position. - Between scan Period → Pause time between one scan and another in milliseconds. - RSSI threshold → RSSI threshold below which the relative detection is not considered significant for the calculation of the position. - Events timeout → time interval beyond which an entry/exit notification in/from an Event zone (registered in the Maps section) is triggered again. - Smartphone outdoor position interval → Sending time of outdoor positions (latitude/longitude) in milliseconds.
Tag tracking - Parameters
This section is under construction and will be available soon.